Monthly Archives: November 2020

Fun with The Sims – Console Version

When the sims was released for consoles in 2002, it was not a straight 1:1 port of the PC game. Whilst the PC version played using a 2D isometric perspective with the sims themselves being rendered in 3D. This was mostly since 3D capable graphics card were not that common in most desktop PC’s, and because The Sims being considered an experimental game, Maxis wanted to keep the minimum specifications as low as possible.

When The Sims was ported to consoles, the developers had the opportunity to render the game fully in 3D, a first in the series. There were however some gameplay secrifices that had to be made, mainly due to the reduced memory of the consoles. First is that you are limited to a single story building – no upstairs, probably to make the game more simple and because it may have been awkward to switch between the two stories using the game controller without resorting to a key combination, as all the buttons had been mapped for other uses. Another annoying limitation was the object limiter, which limited the amount of objects you could have on a lot, due to the amount of memory on the consoles.

The Gamecube release, captured from Dolphin Emulator

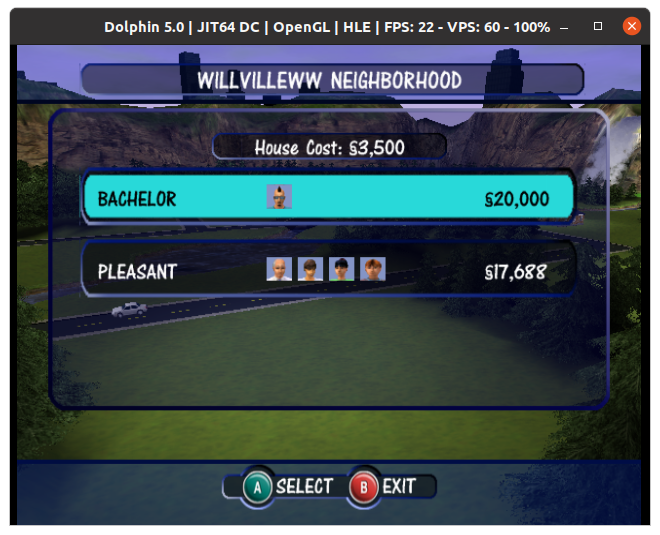
Despite the differences with the graphics, the gameplay was mostly intact with many of the objects from the PC base game being included, along with some console exclusive objects. Many of the pre-made Sims appear here with the same members, The Goths with Mortimer, Bella and Cassandra, The Roomies with Chris and Melissa, the Newbie, Pleasant and Bachelor families still being present. The only major difference is the Sims and their world being fully rendered in 3D. The lots are mostly the same with the absence of the second story, although the mansion from the first game is missing.

A new addition to the game was the ‘Get a Life’ mode, which was a single player level based mode where you create your own Sim who has to progress through a rags to riches style of gameplay. Your Sim would basically start from their parents house and would have to get a job and upgrade their skills, after two promotions they would progress onto the next stage in a new lot, along with certain other challenges. The en goal being to reach the top of their career ladder and to get married. Players would also have to upgrade the lot by purchasing new furniture, meeting new friends and hosting many parties. The Sims Bustin Out would later expand on this formula greatly, and would be the basis for the Urbz and would influence The Sims Life Stories spin offs.

Another console exclusive feature was the two player mode, where two players could control two different Sim’s on the same lot by using a second controller,this would split the screen and allow each Sim to be controlled by both players. There are also mini games (Challenge mode) that are centred around this feature were two players would compete to get the most friends, or to get the cleanest house.

Because of the Similarities of the PC and console versions, I wondered if they were both compatible with each others data, as in you could extract a lot from the PC version and load it on the console version. There are a few challenges to this, since the PC version used 2D graphics compared to the 3d models that the console uses, and the Sims themselves are rendered differently. It’s worth looking at the console disk images to see if there are any similarities to the PC version.

PC Version (The Sims – Base Game only)Console Version
Two story buildingsSingle Story building
Can only choose from a selectionCan customize hair, face, eyes, mouth, makeup
Can only choose from a selectionCan customize top, bottom, shoes and colour of each item
10 lots selectable6 lots selectable + 1 hidden/disabled
8 selectable sims per household4 selectable sims per household
Cannot edit lots without a family moved in until Unleashed EPCan enter build/buy without a family moved in
One PlayerUp to two players with two controllers
Near unlimited objectsObject limiter (may vary on console)
Online Exchange support – Now OfflineNo Online support for DLNS/Xbox Live

The ARC

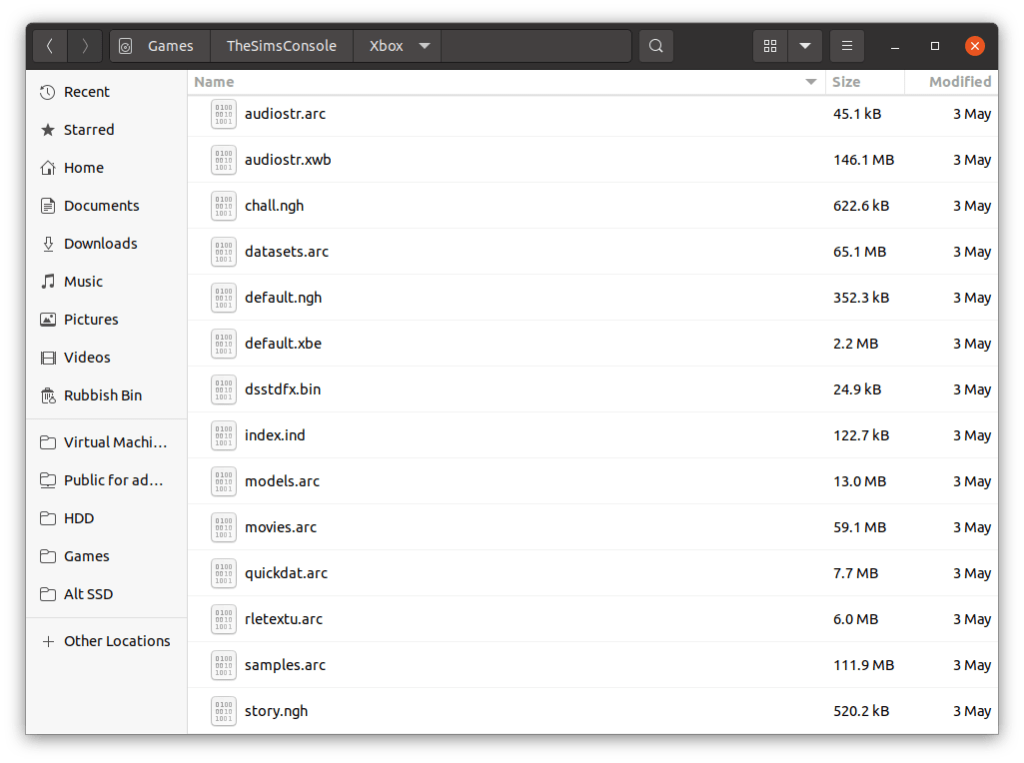
I started with the Xbox version, since the XBOX was built on the PC architecture with it’s Intel processor,and since it’s possible to ftp directly into a modified Xbox rather than having to extract and recreate an iso image. First obstacle I ran into were these ARC files, which were also present in the Gamecube and PS2 versions. They were quite large files and contained a bulk of the games size. These files store a bulk of the games content.

In order to extract data from this you will need a custom utility with a plugin that understands these formats. From a bit of research ARC was a older compression format what fell out of use once zip took over. Nintendo also used ARC format as a container format for their games similar to the CAB format used on Windows however this seems to be a different format only used by Nintendo. There are also several different ARC formats that are incompatible with each other, which makes it hard to extract files form this format, and makes it harder to inject files into an existing ARC file. i’m not sure if these formats are different format that share the same extension, or there is some encryption/passcode involved.

What’s interesting is each console has a different file size for their respective ARC file, with the Gamecube being the largest. Maybe they are duplicating the files on the Gamecube version in order to reduce loading times? or the Xbox version might be compressed more? This would make sense for the sound and cutscene since they would be using the wmv and wma format for audio on the Xbox, the PS2 may have used MPEG2 since the Emotion Engine had an onboard MPEG2 decoder for it’s DVD player. The Gamecube does not have an onboard decoder so it needs to decode video and audio in software, which would affect the codec’s being used, and in turn affect the file size.

Runtime Folder

Looking on the Gamecube disc there is a Runtime folder that holds data for the default neighbourhoods, along with the sims, lots, and occupied objects (but not the objects themselves, or the skins, wall or floors). At first I assumed this was where the game pulls the default neighbourhood data from when creating an new memory card file, and would act as a template, however closely inspecting a batch files, it seems this folder is used to create the .ngh file which is kind of like a zip or cab archive of the above folders. The runtime folder is not present on the Xbox or Playstation 2 versions, but the ngh files are.
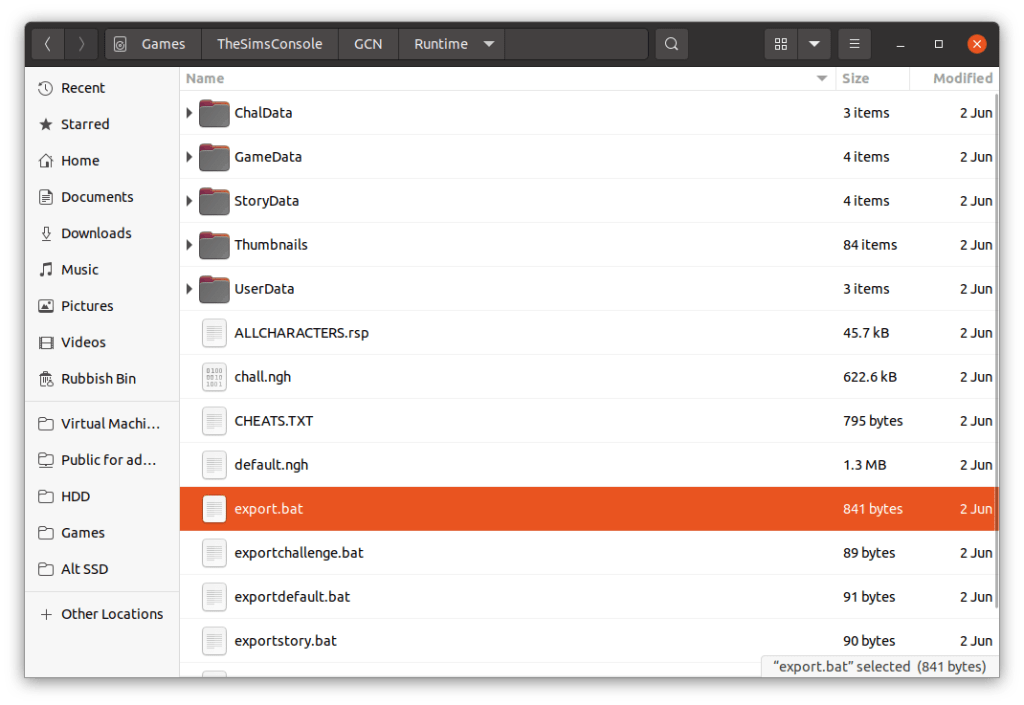
Folders

ChalData – for the 2 player lots

StoryData – a neighbourhood for the get a life mode

UserData – a neighbourhood for the play the sims mode / sandbox

These are template folders, I assume they get created to the memory card upon creating a new game, and the memory cards hold an ‘zipped’ or arced copy of the files.

There are 4 batch (.bat) files that were used to create the ngh files, here’s what exportstory.bat looks like;

..\bin\SimsNghExport.exe @allcharacters.rsp -iWallsFloors.ini StoryData story.ngh

pause

SimsNghExport.exe – program used to create the ngh files, sadly not on disc

allcharaters.rsp – this file lists all the NPC and playable sims that shipped with the game, what gender/age and their skin-tone and clothing but NOT personality or job. I’m guessing that specific data is stored in the respective userXXXX.iff file, with the console specific stuff being referred to in this ngh file. The key field looks to the the sim name since I cant find any userid?

iWalllsFloors.ini – not sure, just a bunch of numbers, might be remapping the PC walls to the console version?

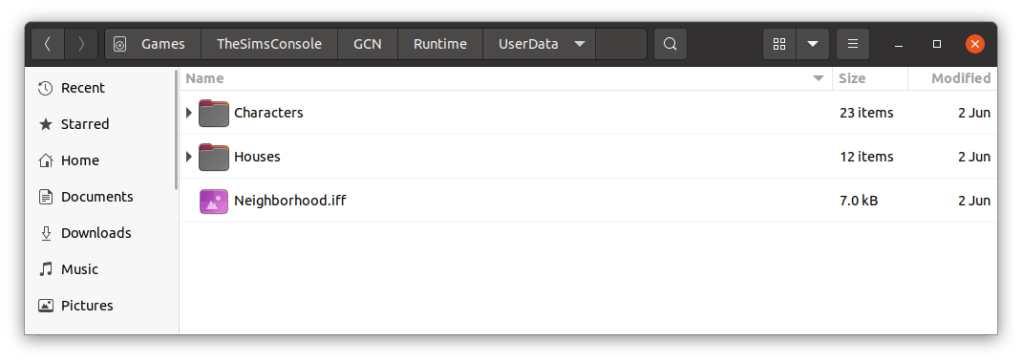
StoryData – folder, contains character files and house .iff files, basically the equivalent to the Userdata folder on the PC version

story.ngh – the output file

need to look the this ngh format, is it an archive? Is it compressed? Can we add and remove data with it?

This got me thinking if we could take this data and load it into the pc version of the game? After all, the extensions are the same (.iff) although the file sizes are smaller. In order to investigate further we need to call a old friend called Windows…

For this we are using the original unpatched sims base game, with no expansions.

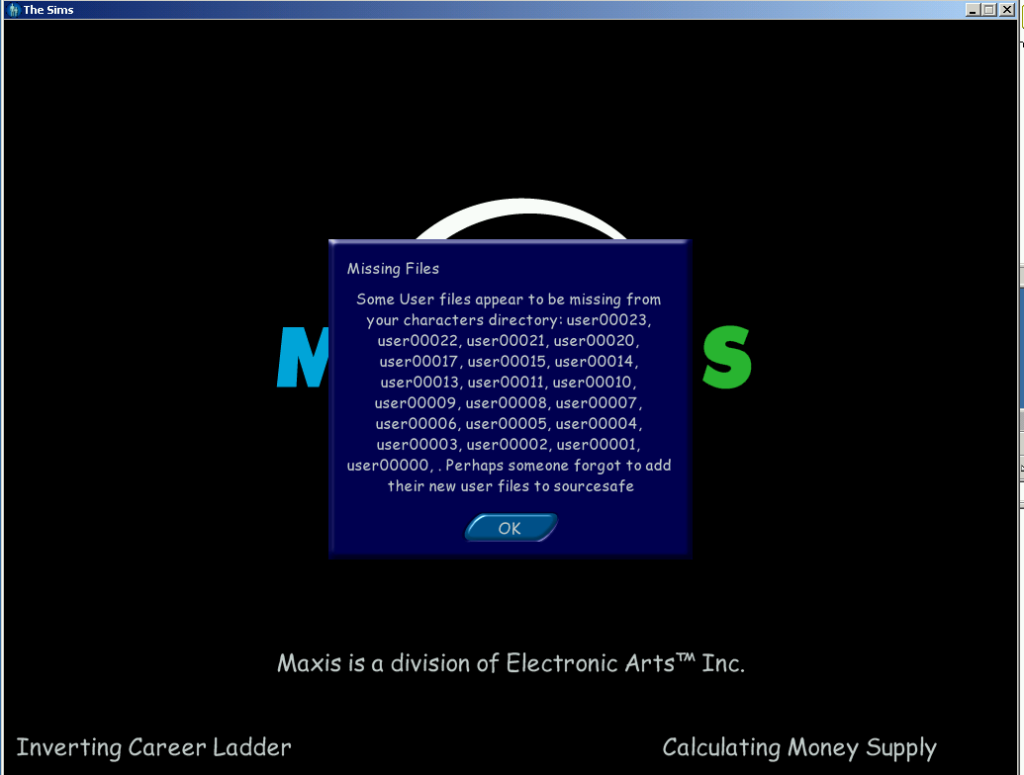
First I started off by copying the entire userdata folder from the gamecube iso into the game files and started the game up. What greeted me was this error message;

The Sims PC missing files

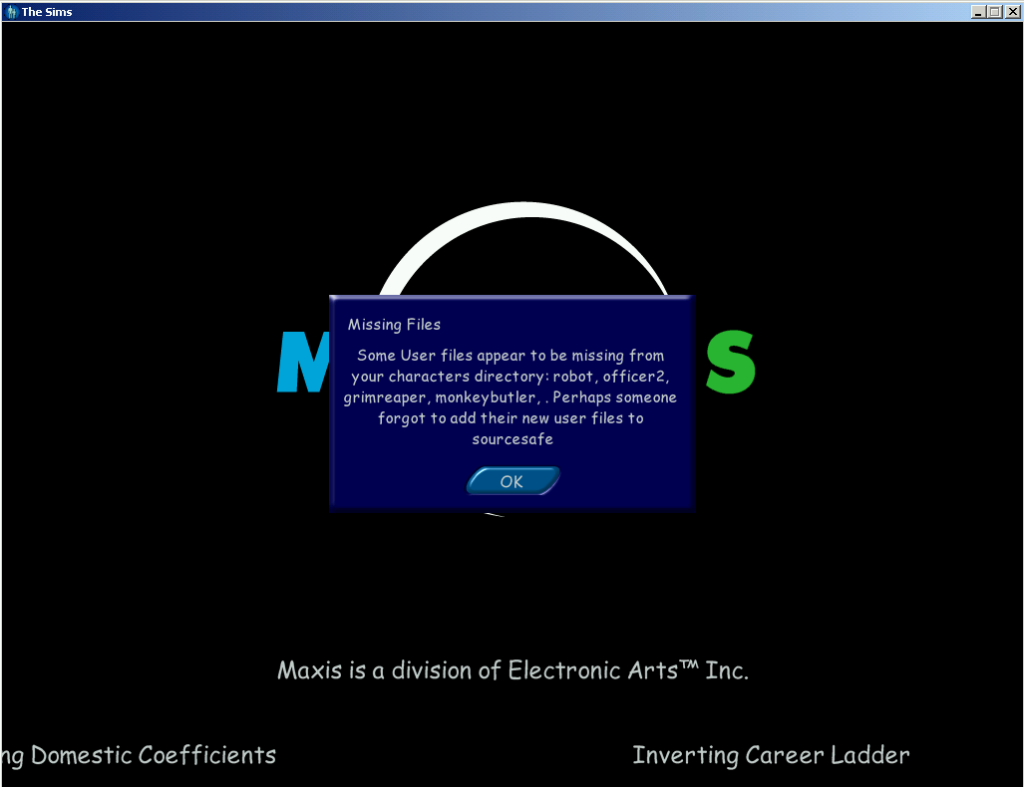
It’s not much of an error since you can click OK and the game to continue to load. Interesting is the names referenced in the message box, Grimreaper, which didn’t appear in the base game, only in the Livin it up expansion pack (GrimReaper does exist in the console version). Monkeybutler which is exclusive to the console release (its part of an object like the Servo robot in Livin It Up, cleans the house and repairs), not sure about robot or officer2?

Also what is sourcesafe?

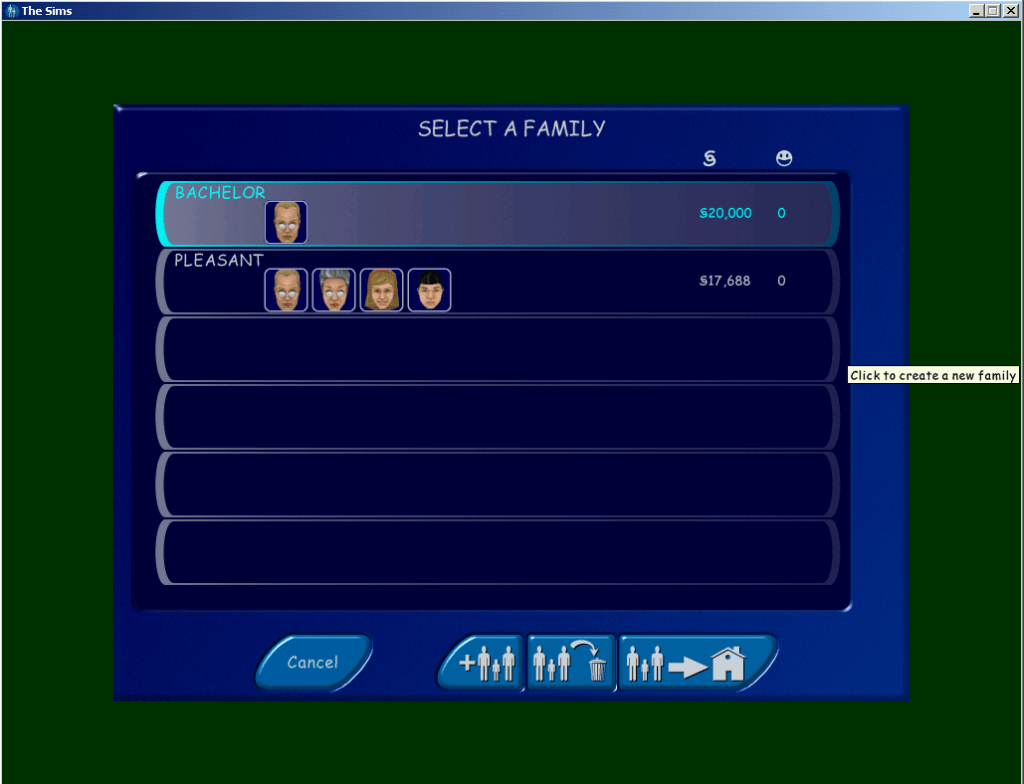
After loading the game I found not of the lots were accessible or even recognisable, clicking on them did nothing and no lot information data would appear. When I clicked on the family bin icon however I could see the two unoccupied families from the console version, the heads and faces looked to be missing and the game has loaded the default templates. Understandable since the console sims are in an incompatible 3d format, I’m surprised the game didn’t crash outright.

The Pleasant’s have not aged that all well
The Sims Willville
Meanwhile here is what they’re supposed to look like

I tried copying it again, this time leaving the neighbourhood.iff filers intact, this time a different error message appears;

The Sims PC missing files

I assume the neighbourhood.iff acts as some soft of database of which sims belong on a specific lot and also deals with NPC assignments.

Loading the Story mode families

What about the story mode folder? For this I did the same with the storyData folder, copied it to the game files and renamed it userdata and see how the game reacted.

The console sims, all can be moved in and loaded with their personalities intact, shame about their heads/bodies

Checking the family bin you can see all the sims used in get a life mode, all from the different households. Some are even listed twice like Dudley and Mimi landgrabb .

The same issue with the lots persist, and after copying back the original files from the PC neighbourhood, I tried moving one of the sims in and clicking on their control panels. The skills and personality points seem to be intact with what the console version would show, although the sim names are always in BLOCK CAPITALS, maybe this was deliberate since it was easier to read on a standard definition TV screens at the time?

Interesting is that there are multiple copies of some sims, the Landgrabs and Mom have duplicate versions. This may be because once you move to another level, the previous sims are deleted except for the langrabb’s and Mom, who’s relationship gets transferred to the other copy. Other sims like the Roomies are deleted once you move from stage 4 to 5.

The Sims PC Error Missing Textures

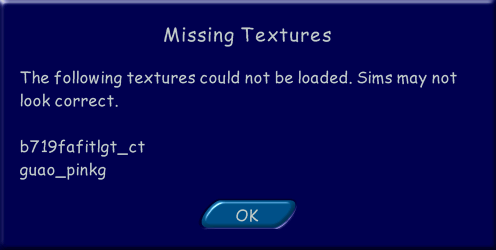
There are also two other families, the Tooter family with the sim ‘DJ’, and a ‘JANE HOUSE’. As these don’t appear in the game, they are either cut from the game or test sims. It’s worth noting than upon loading the families in a lot you will receive the below errors message, however this wont effect the game and will continue to load normally.
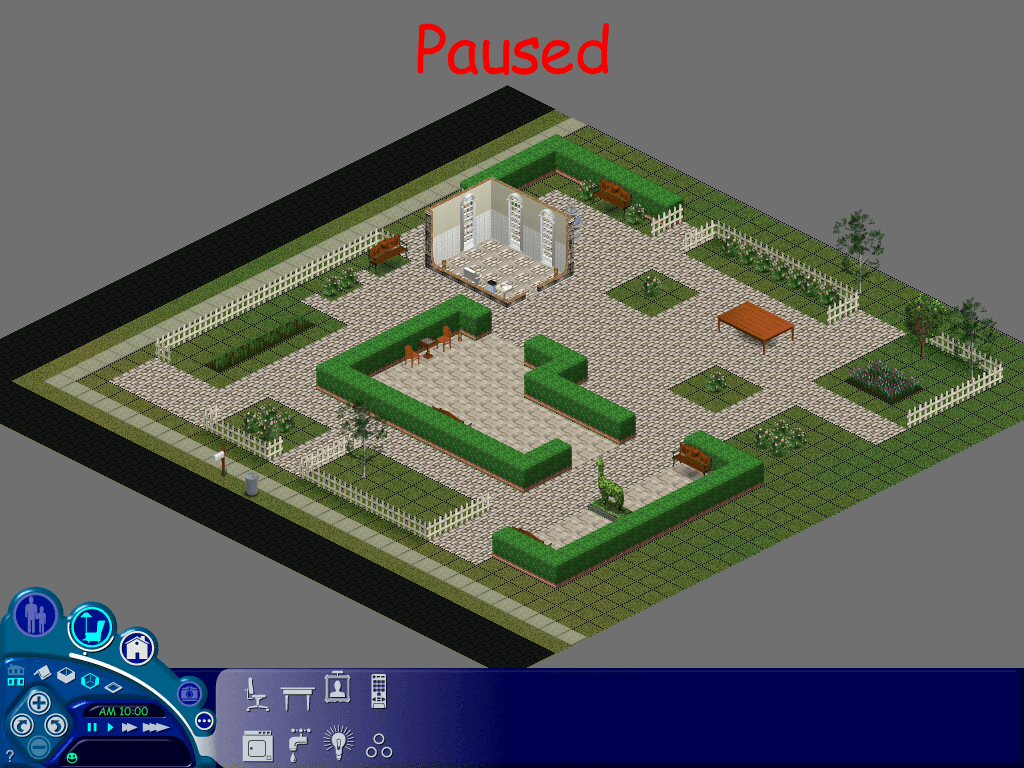
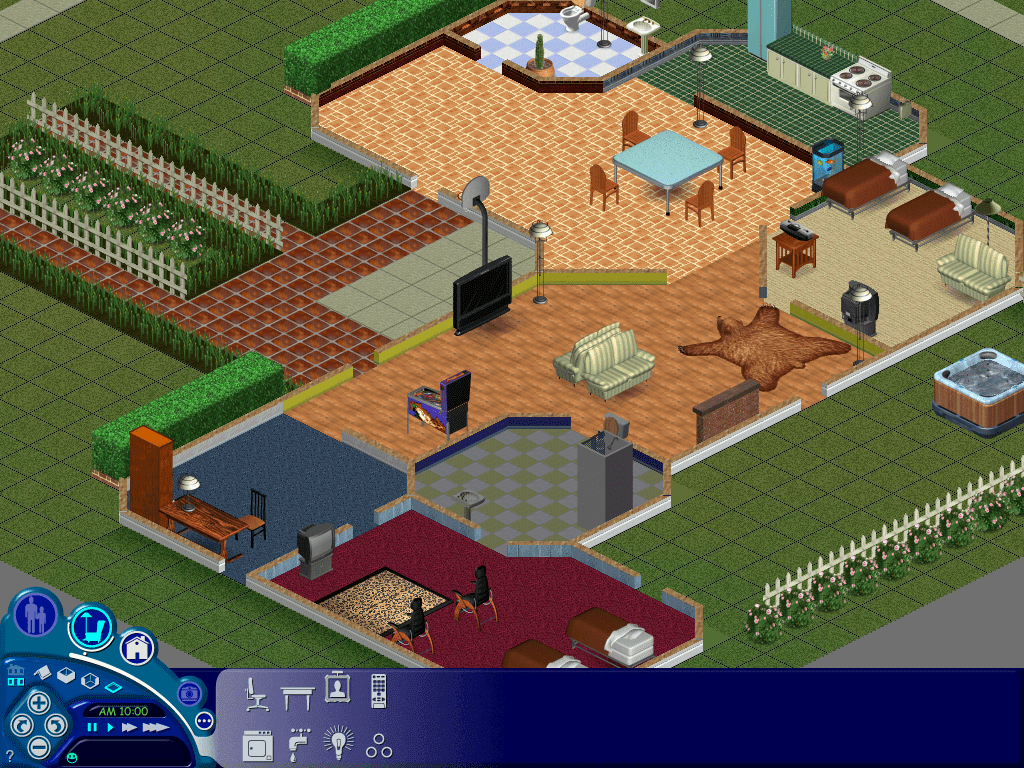
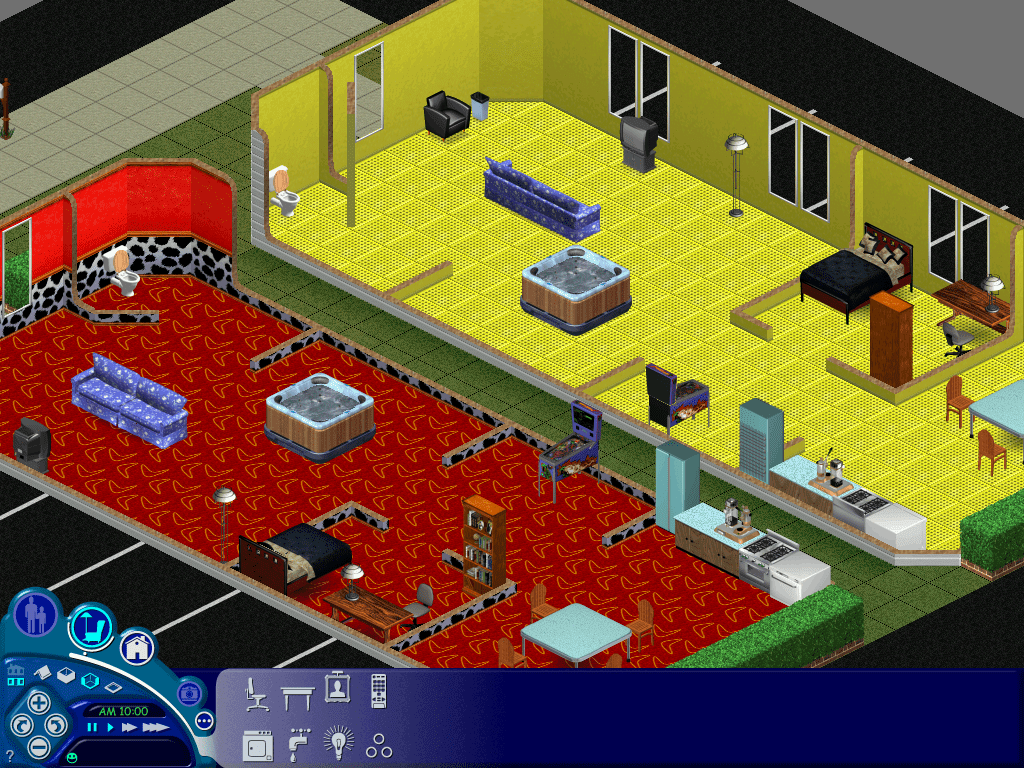
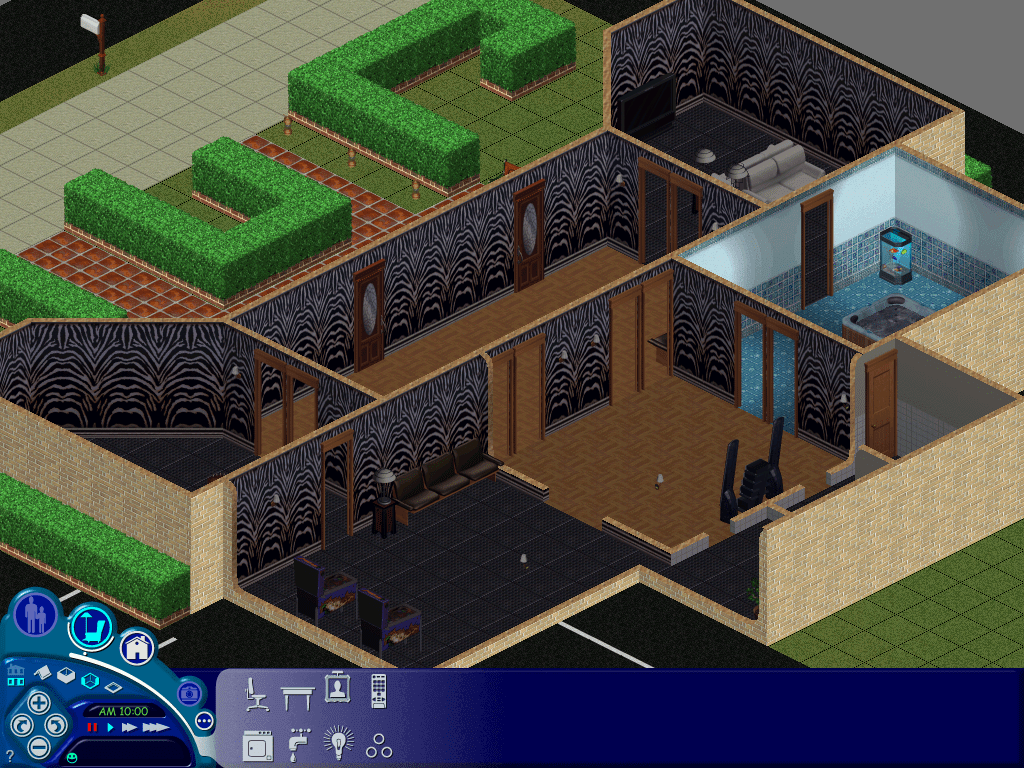
Loading the lots

The Sims 3 Sim Lane
Console version of 3 Sim Lane, missing it’s second floor. Known as 3 Sim Avenue in the console release.

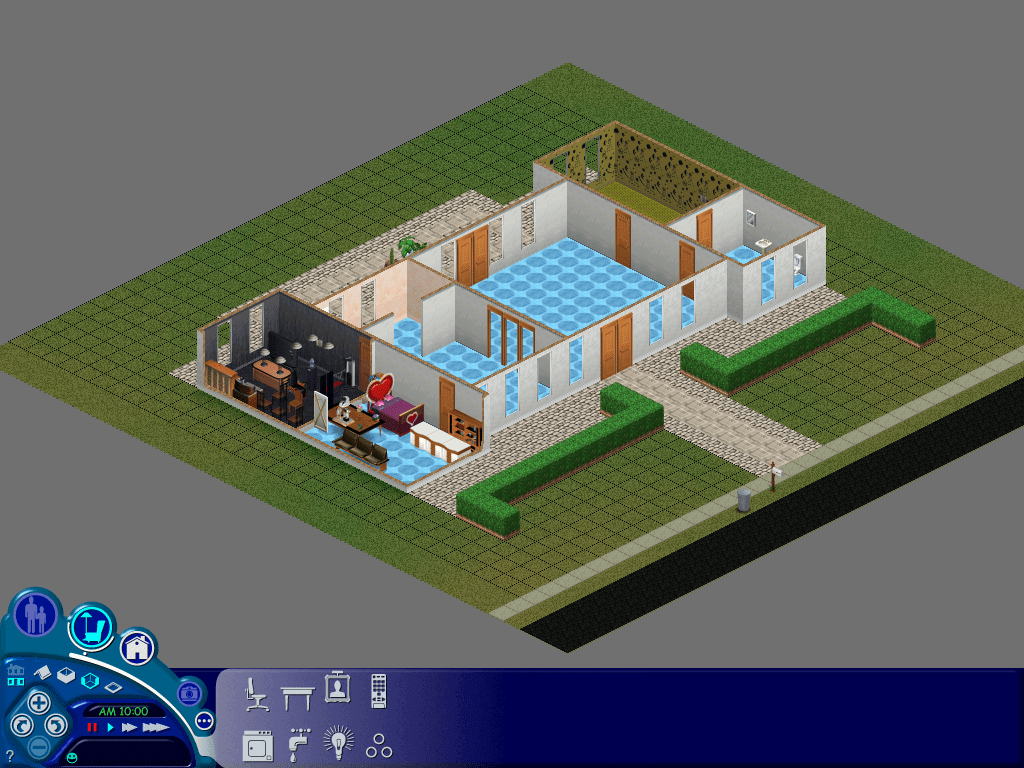
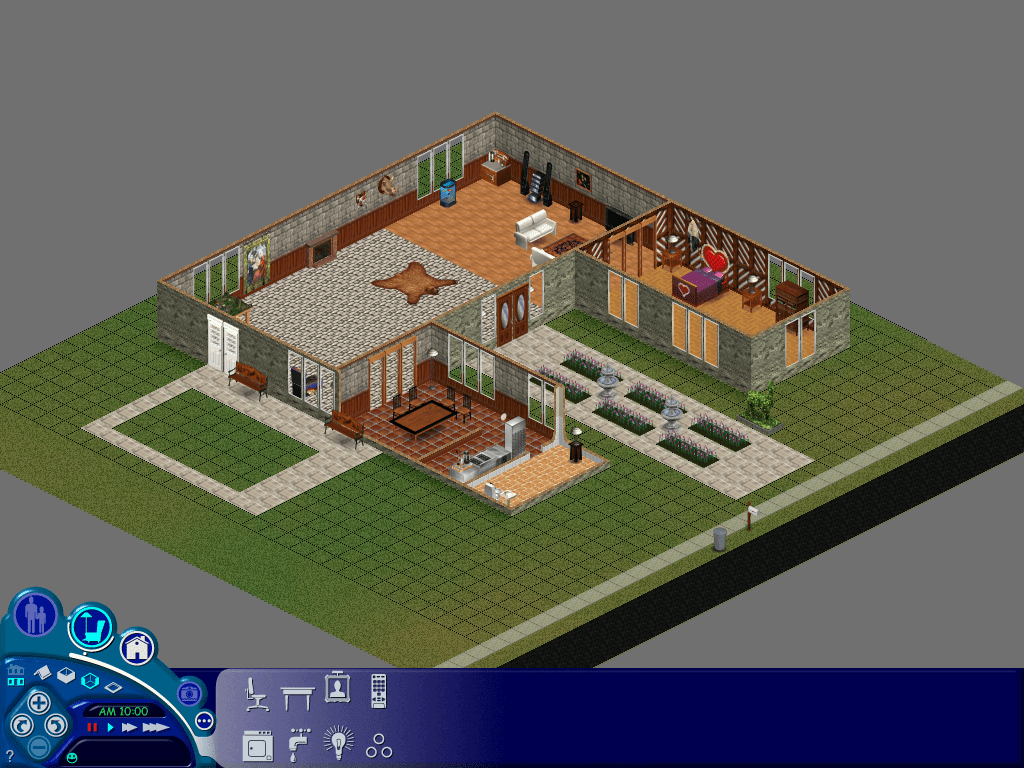
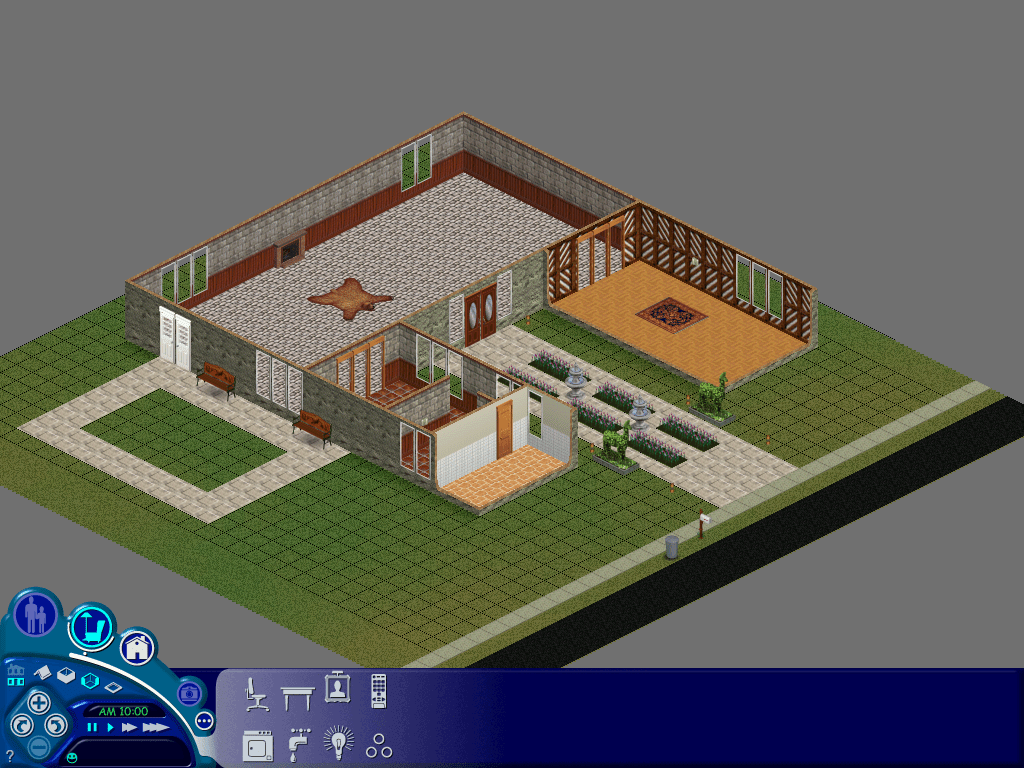
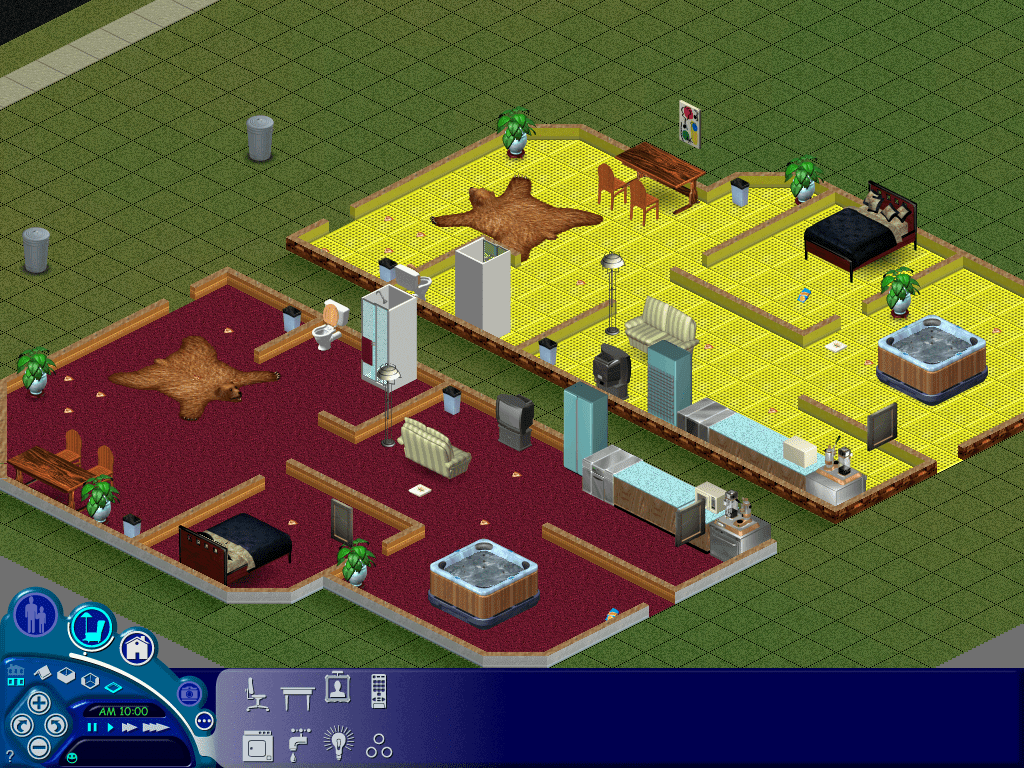
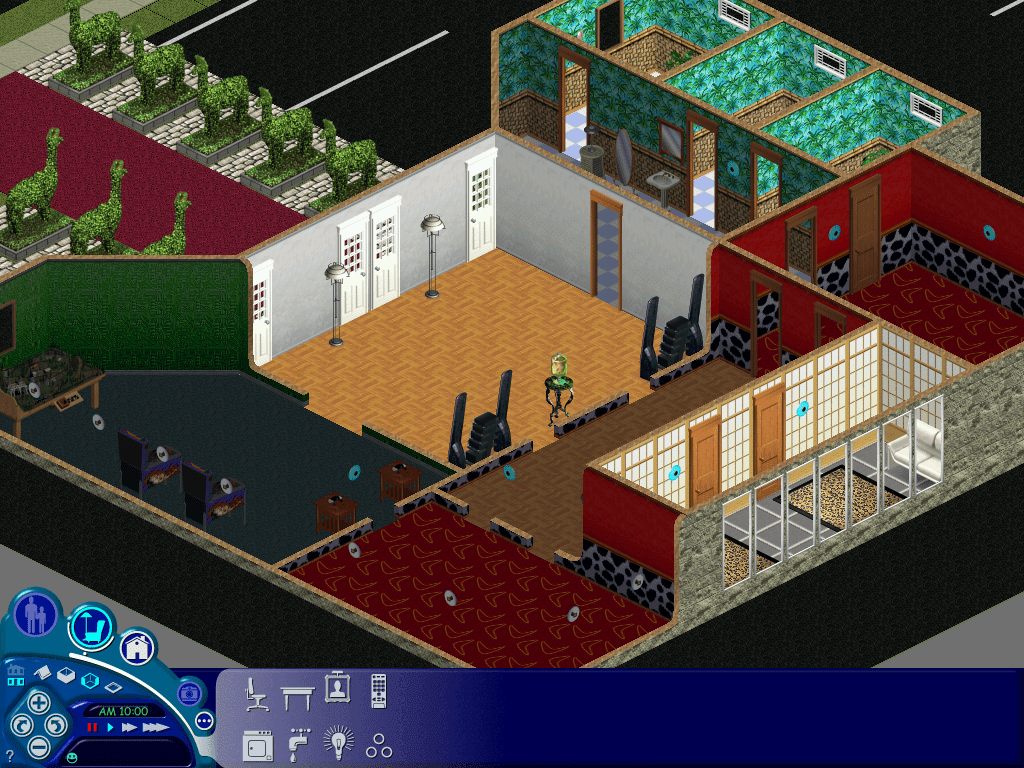
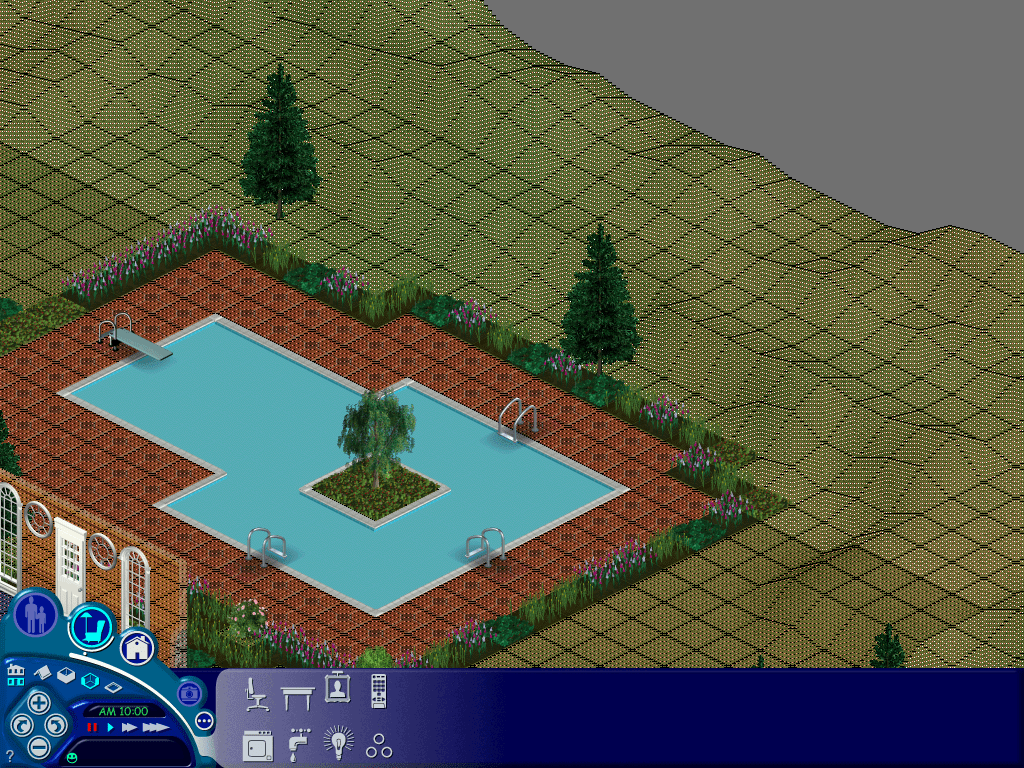
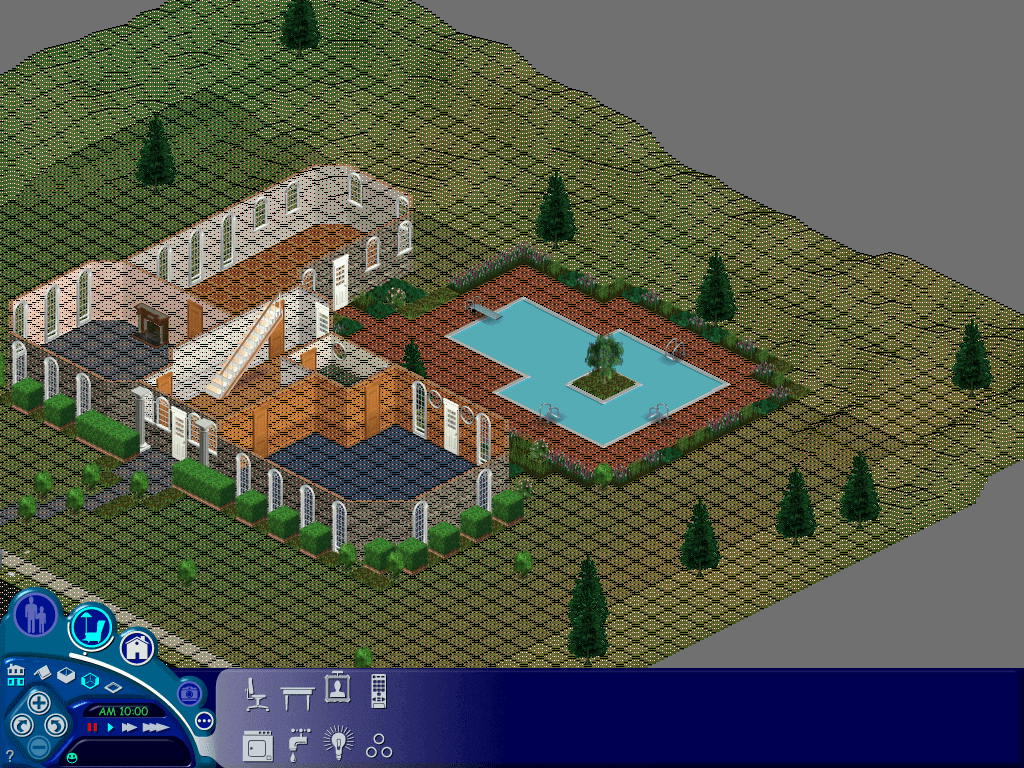
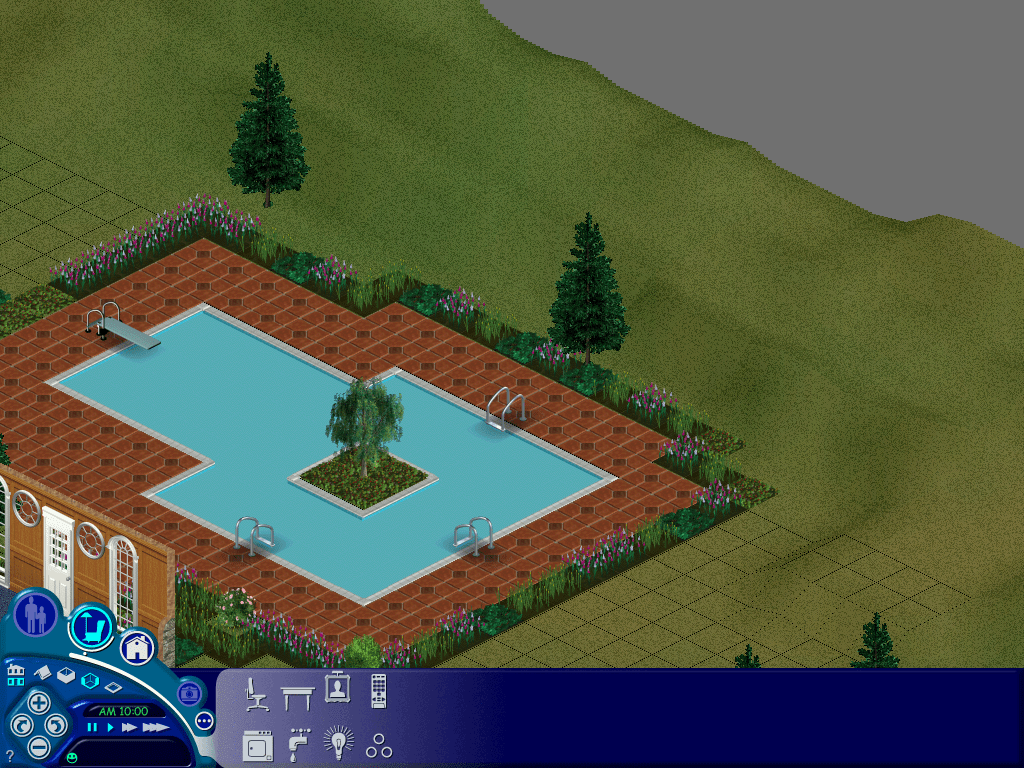
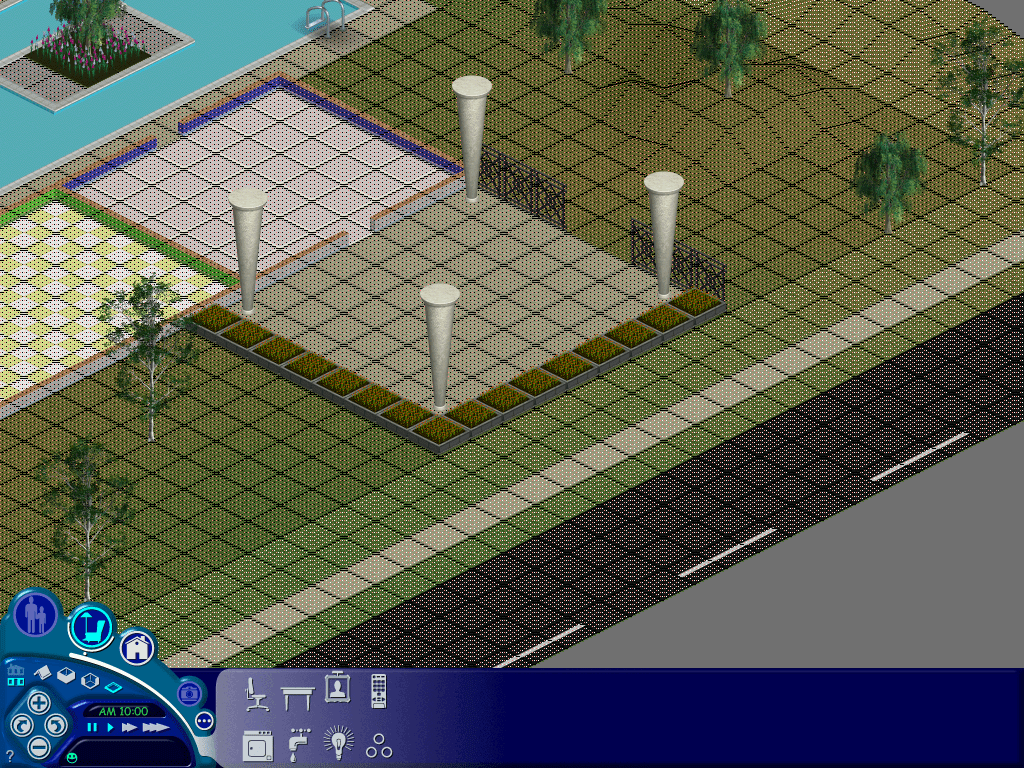
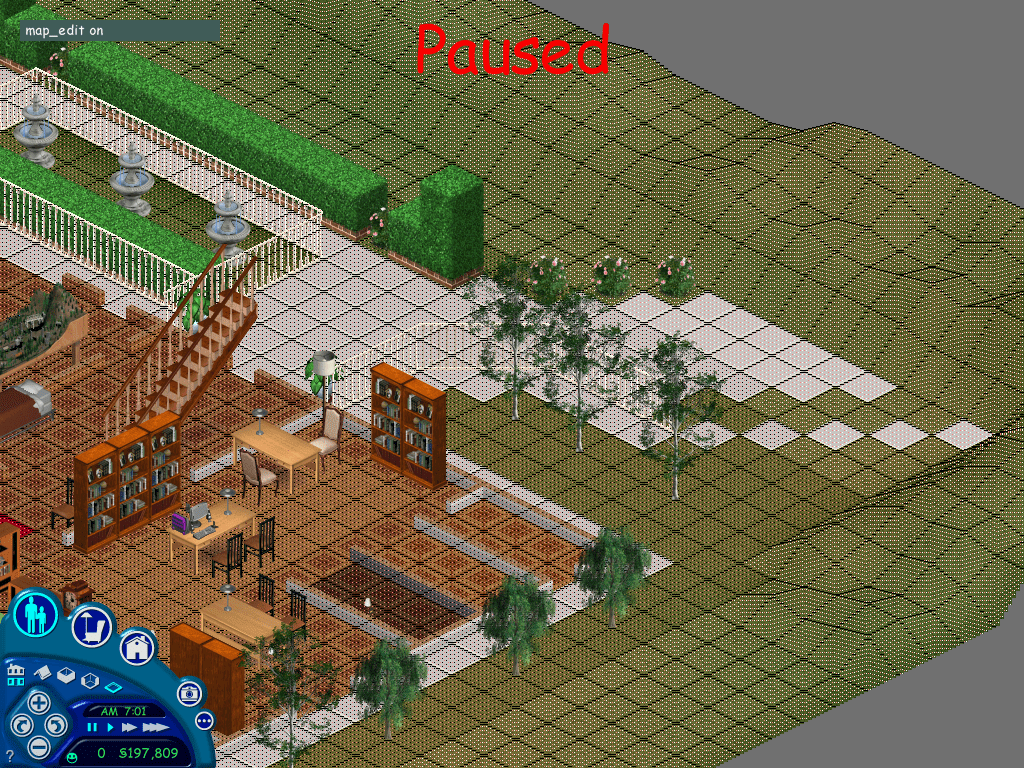
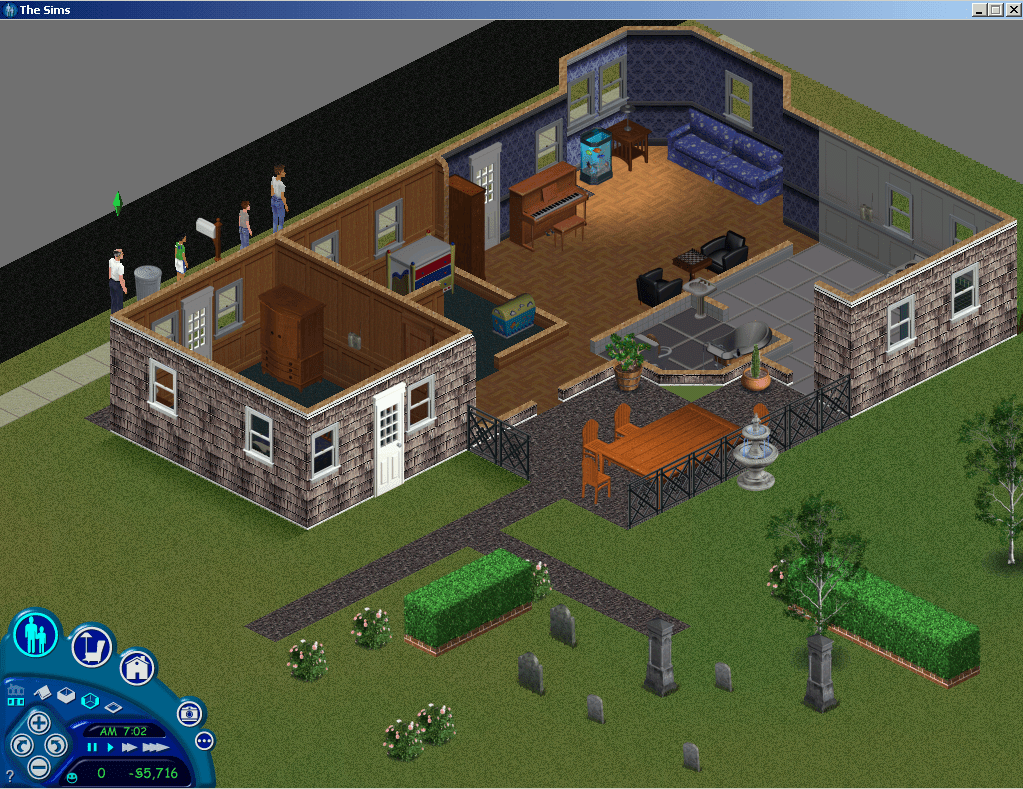
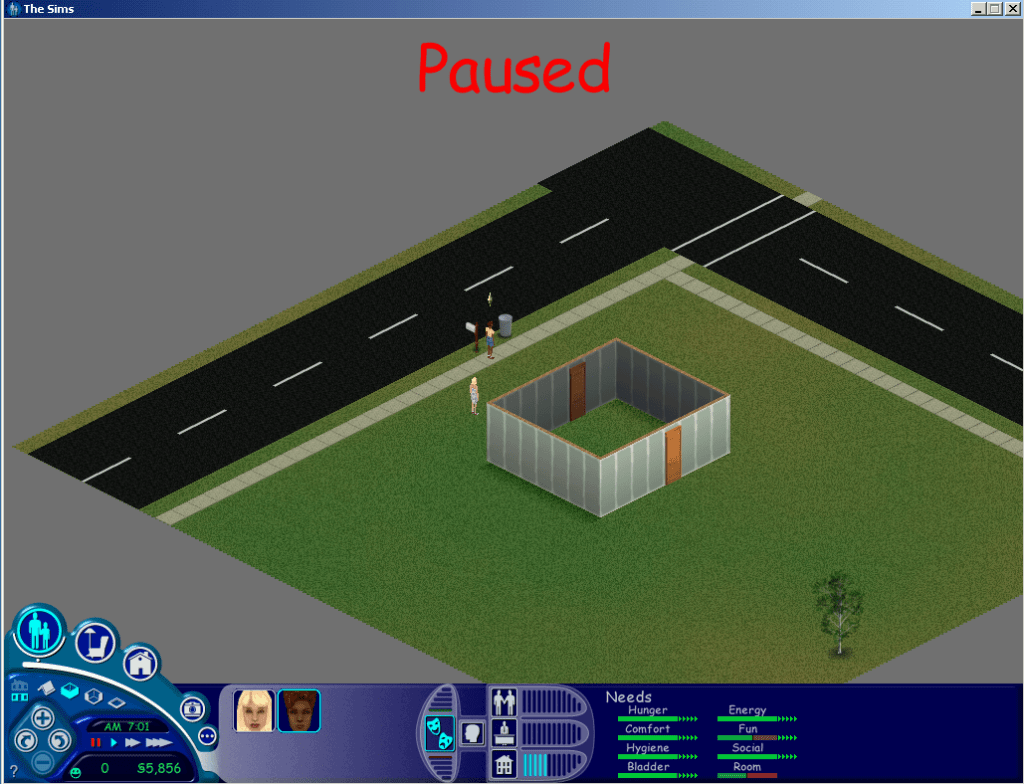
To get the console lots to load you need to trick the game into loading them, since starting the game up the game would just ignore them and the lot would be undetectable from the nhood screen, however if you load up with the original pc lots, alt-tab out of the game and replace the lot and then alt tab back into the game and load the specific lot, the game will load the lot. You will receive a missing objects error message which is to be expected, any objects the game can match will be present in the lot. Walls and floors are slightly different, the game will load the respective one but it if it tries to load a wall that is not there it will default to as substitute, the same happens with floors, and sim heads and bodies. Swimming pools will be missing since the console version used fixed design swimming pools, the PC version instead allows you to build your own swimming pool.

Console version of the Goth house, even the grave stones are intact

Unfortunately this is when I started to encounter issues with the base game, as loading certain lots would just cause the game to crash regardless, lot 4 in particular was very problematic. Switching to the The Sims complete collection fixed this and was able to load all of the lots. It was also more compatible since the console games contains content that was also included with later expansion packs, It was defiantly better at matching the correct walls and floors. Unfortunately sims complete collection refused to accept the neighbourhood iff file or the characters/sims themselves, which meant I could not load the console sims directly. Perhaps the neighbourhood files have changed significantly since unleashed in a way that breaks compatibility with the older code. The Sims Deluxe Editions might be a good compromise to test out but for now lets continue with Complete collection.

This lot appears a couple of times, however i have never seen this in game

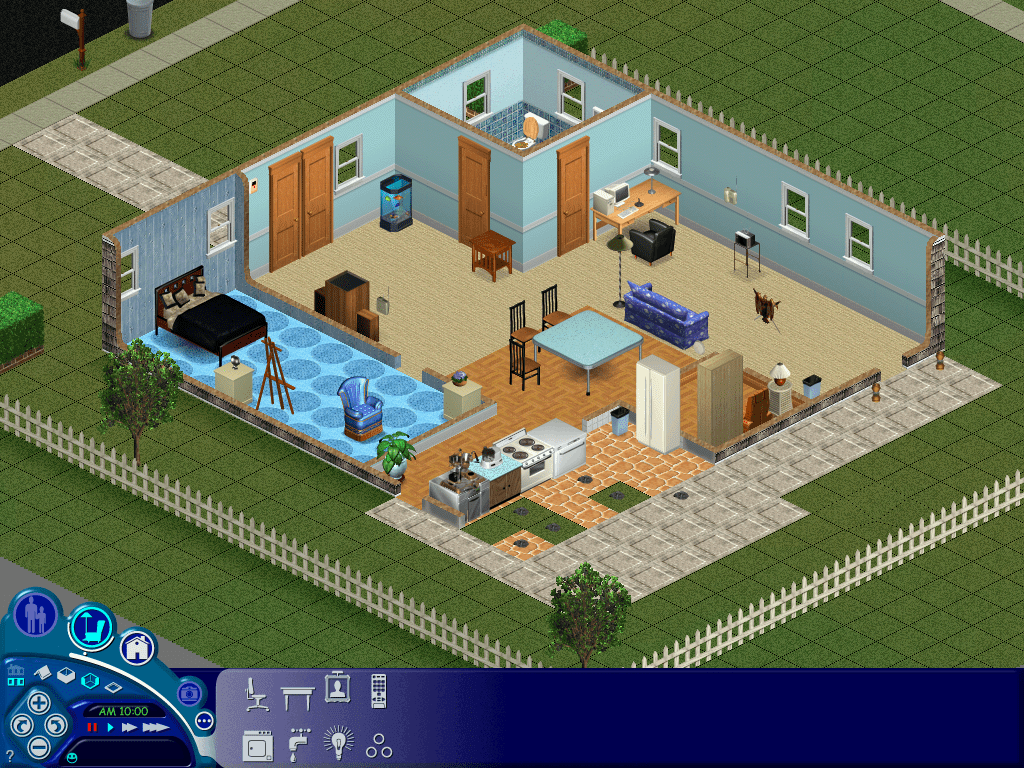
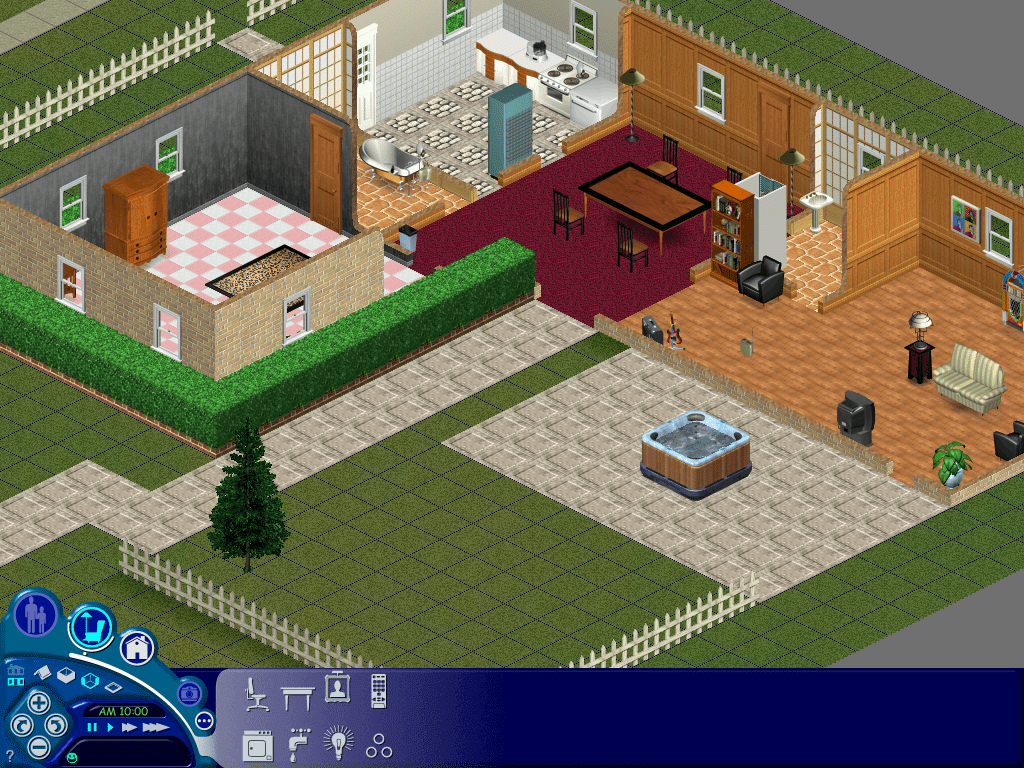
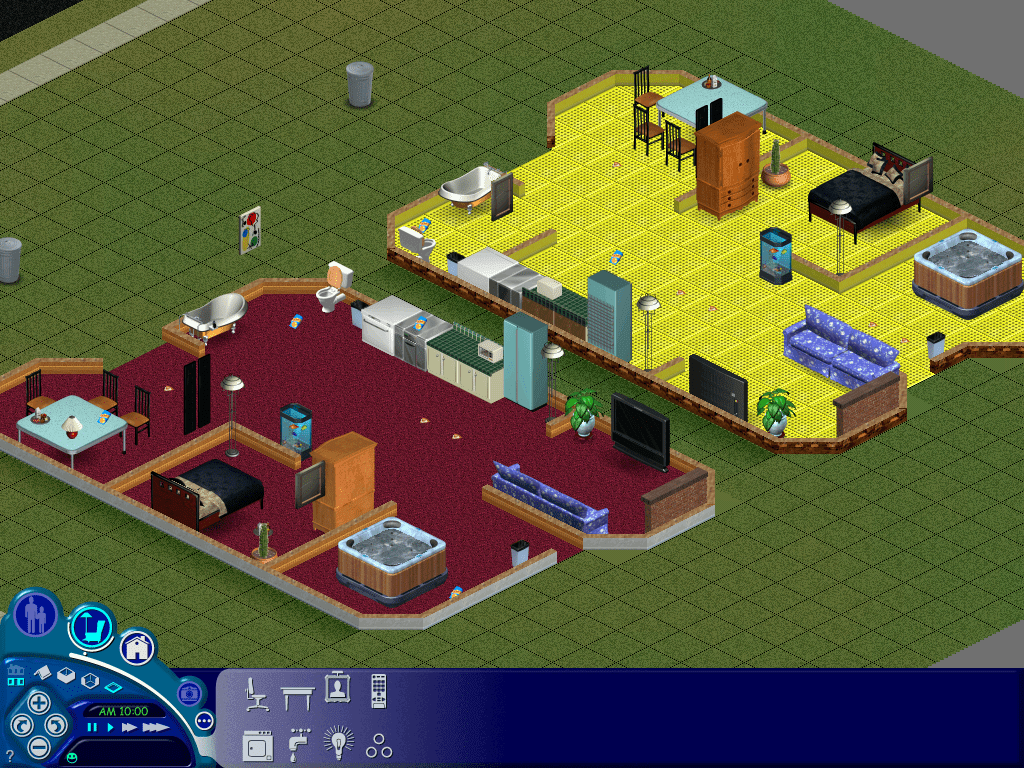
Userdata Lots – Play the Sims Mode

After loading a lot you must save before exiting to the hood or the game, as the game will crash. Em guessing there is incomplete data that the game tries to fill in when saving, or the game tries to load the 3D thumbnail used on the console version which wont render on the PC version.

FilenameHouseholdComments
House00It’s built but no doors or windows or any objects?
House01Empty
House02Empty
House03RoomiesOk
House04Empty
House05GothOk
House06Empty
House07Newbie
House08Empty
House09Empty
House10Mostly empty lot with a small house and two doors

No luck getting the occupied sims themselves to migrate over, must use a different format for sims that move into occupied houses. only family’s that are in the family bin.
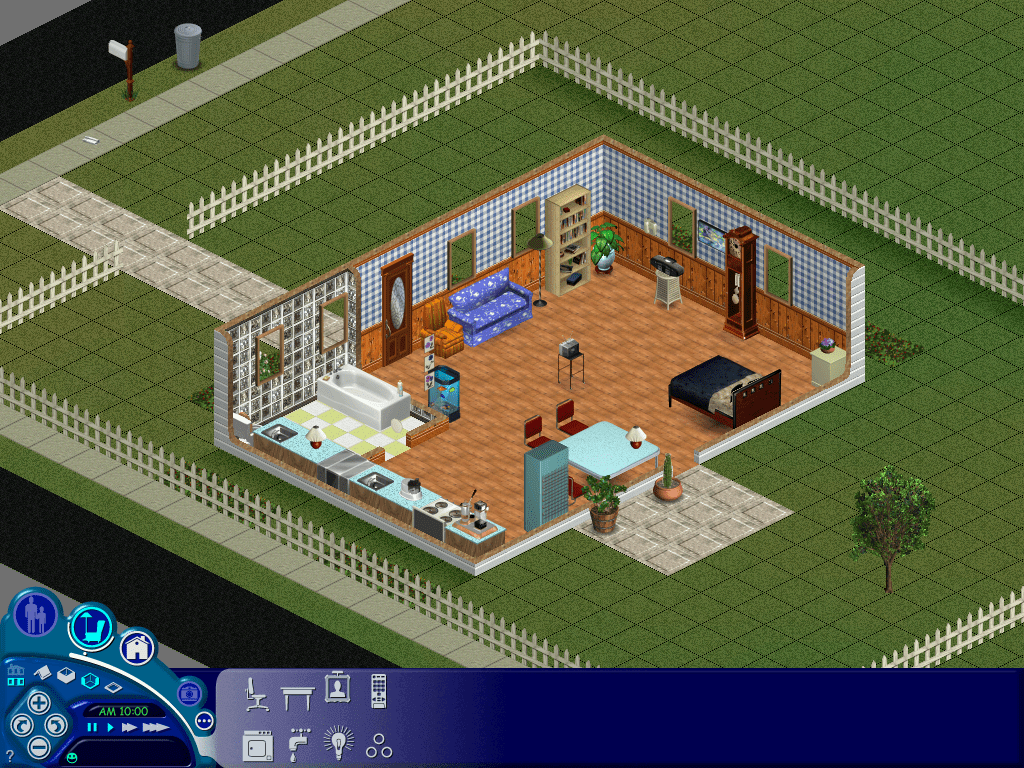
Story Data Lots

FilenameComments
House00Exactly the same as House00 in Userdata
House01Level 1
House02Level 2
House03Level 3
House04Level 4
House05Level 5
House06Level 6
House07Blank level
House08The mansion at the start of the game, dream sequence
House09Vacant Lot
House10Mostly empty lot with a small house and two doors

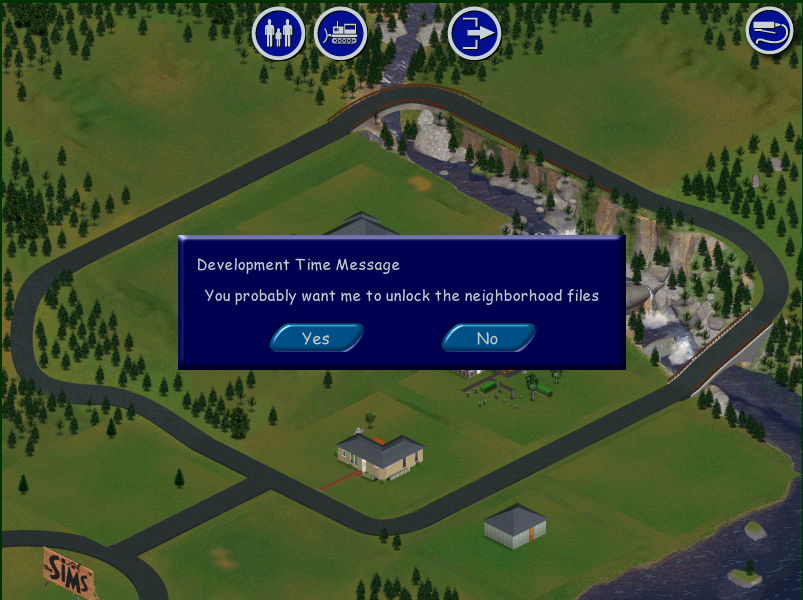
After placing House10, a development time message keep appearing, selecting yes or no yielded no noticeable effect.

The Sims PC Development time message

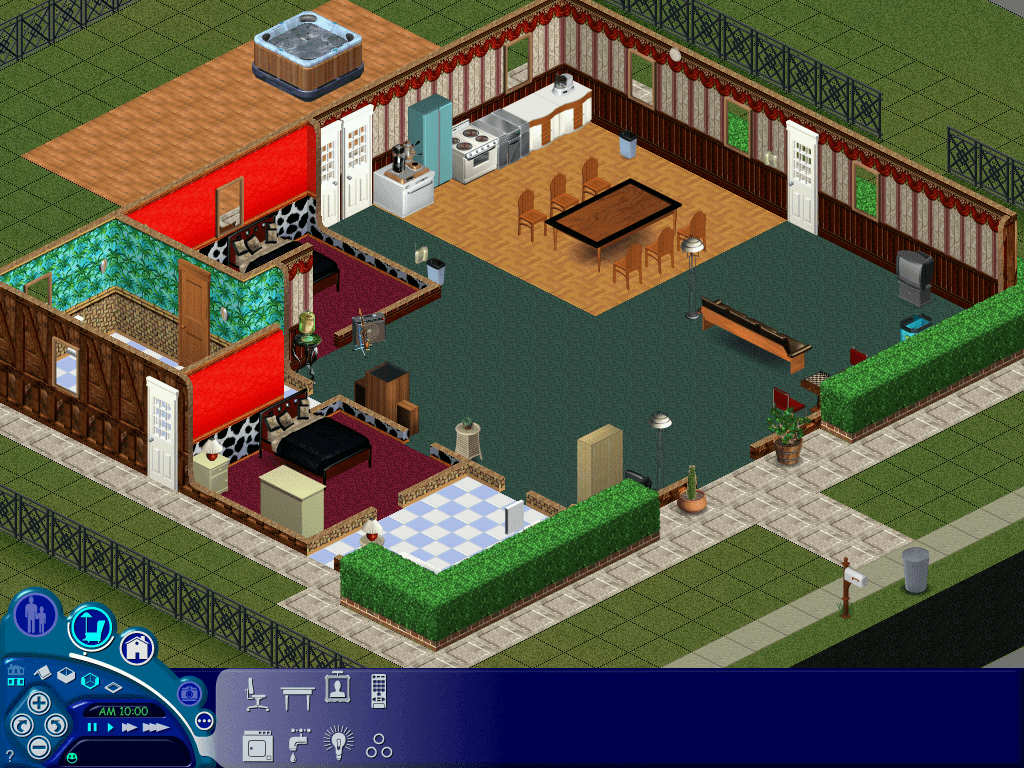
Char Data Lots (Challenge mode)

FilenameComments
House00Exactly the same as House00 in Userdata
House01Maid’s House
House02The park
House03The Museum
House04The Frat House
House05Club ABHI
House06Club
House07Party Motel
House08Handymans House
House09Mostly empty lot with a small house and two doors
House10Empty Lot

Files

Links to both extracted Lots and Character files in separate archives

https://app.box.com/s/f8bafnxzrj35n4yiefjackevjw6dfket

The lot files were imported using The Sims Complete Collection, but should work with any game as long as you extract the HouseXX.iff file into your own UserData folder

The character files were created using The Sims (Base game) and may not work past Unleashed, these contain the sims from the ‘Get a Life/Story’ mode and Challenge , Play the Sims / Sandbox mode.
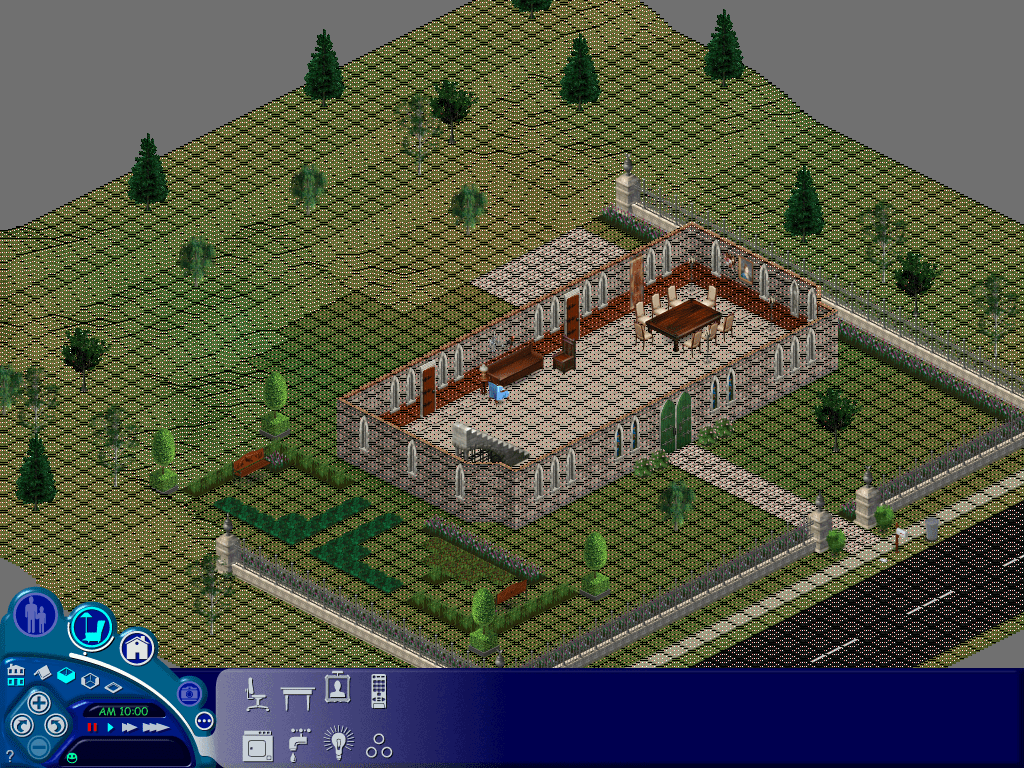
Gallery

Ultimate Sims 1 Neighbourhood

Over the course of the original sims lifespan, Maxis had released early forms of free DLC (Downloadable Content) for free on their website. Listed as ‘Get Cool Stuff’ players were able to download free families, objects and skins to use in their game. Whilst skins and objects are easy to integrate into your game, lots and families are harder, especially if you had the original base game that had no support for multiple neighbourhoods.

This meant if you wanted to use the downloaded families, they had to overwrite an existing lot in the neighbourhood, which would replace the family on the lot. Livin large mitigated this by allowing multiple neighbourhoods, but Unleashed went one step further and expanded the neighbourhood to accommodate a large amount of lots.

One thing that bothered me with Livin Large was the Mashuga family, who up until Unleashed were the sole residents of neighbourhood 2. Maxis intended for you to create and move in sims to keep them company but personally i’d rather have all Maxis sims in one hood.

Playing Sims 2 for as couple of years I came across multiple projects that seek to combine multiple neighbours into one ‘Megahood’, where pre-made neighbourhoods could be merged into one large neighbourhood. This took advantage of the sub-hoods introduced in the Open for Business expansion pack. For example Pleasentview would be the main neighbourhood, with Veronaville, Strangetown would become sub hoods, known as shopping districts in the game. You could even do this with hoods introduced in later expansion packs, and hoods that shipped with the Sims stories spin-offs. By doing this you could have one large hood where different sims from different hoods could interact with each other.

I wondered if something similar could be done for the original sims.

For this we need to be using The Sims with at least Unleashed expansion installed, since the increased lot slots were a requirement for this. Livin Large is also a desired expansion to have, solely for the Mashuga family. In order to have all Maxis families and lots in one hood, we need to move a couple of files around, unfortunately since the game lacks these tools we need to resort to trusty Windows Explorer. As always make sure you back up your UserData folders. The goal is to have one large neighbourhood with all Maxis made houses and families

To keep the neighbourhood appearance as genuine as possible, since we will be exchanging lots that may have a different size, some lots may overlap onto the world or another lot, we can use the map_edit tool to overcome this.

Download Links

Since the original Sims website was removed a while ago, all of the Maxis downloadable files were no longer obtainable, however they can be downloaded using the below links;

https://archive.org/details/thesims1getcoolstuffcontent

SimEchoes Archive

Phase 1 – The Mashuga’s

Before & After the lot relocation

We want to transfer the Mashuga family from hood 2 to hood 1. If the game is running, exit the lot and go to the hood screen. Then alt tab out of the game. The Mashuga’s reside in Lot 9, but this clashed with the Hatfield family who also reside on Lot 9, so we move the Mashuga’s to a vacant lot. The ideal lot found is lot 52, because the lot size is identical (2646 Sq Ft) and has two roads perpendicular.

To do a lot swap we need to temporally suspend the game by using alt-tab, then navigating to the game installation directory to manipulate the files

The lot will be vacant, here’s what I did to import and migrate to another lot;

  1. First exit back to the nhood,
  2. Switch back to nhood 2
  3. Enter the Mashuga lot with family moved in,
  4. Save the lot, regardless if any changes or any time has elapsed, we do this so the game generates an export file.
  5. Exit the lot back to the nhood screen
  6. Alt-Tab out of the game, and navigate to the game userdata 2 directory, then open the Export folder
  7. Copy the Mashuga.FAM file and paste it into the Userdata/Import folder, Has to be Userdata not userdata2
  8. Alt tab back into the game, the import button should be lit, switch back to the nhood 1 and press the import button
  9. The game will import the Mashuga family into lot 9 an will replace the family on that lot, this is temporary as we will be moving them to another lot.
  10. Verify the lot works by loading the lot
  11. Evict the Mashuga family from lot9 by clicking on the Evict button, this will move the family to the lots and houses bin
  12. Move them into the empty lot 52
  13. Save the game and return to the nhood
  14. In the Userdata2 folder, enter the Houses folder and copy House 09 file to the desktop, or to a temporary folder.
  15. Rename that file to House52 and copy it to the directory userdata/Houses. The Userdata folder is the first nhood, with userdata2 being the second nhood.
  16. Alt tab back into the game and switch to hood1, or hood 2 then hood 1 if your are already on the first nhood.
  17. The Mashuga house will appear on lot 52 Ridge Road.
  18. Enter the lot and the family should load near intact, if there are any red circles on the sims, click on them and they should spawn near the mailbox.

The Mashuga family should now be fully playable.

Phase 2 – Preparing for the Maxis refugees

Here is some information about the downloadable Maxis families

Family nameLotConflicts
Jones1Hood1: None
Hood2: Vacant lot with Home
Hatfield9Hood1: None
Hood2: Mashuga Family
Snooty Patooty2Hood1: Vacant lot with Home
Hood2: Vacant
Valentino8Hood1: Vacant
Hood2:Vacant
Maximus4Hood1: Vacant
Hood2:Vacant

The Valentino and Maximus family have no clashes and can be imported into a stock maxis hood without any issues. The Hatfield family can be imported and will replace the old Mashuga house, but since we have teleport-ed them to lot 52, that wont be a problem. The Jones family can also be imported without any issue on hood 1 also.

The Problem is the Snooty Patooty family. If you imported the family into the stock first nhood, it will replace the mansion on lot 2. We don’t want this to happen, especially since its a really nice house. We’d want to preserve it so like the mashuga house we can move it to another lot. However lot 2 is quite a big lot and if we were to migrate it to another empty lot we would have an issue where the lot would overlap another lot. This isn’t an issue when playing the game but looks funky on the hood screen.

After experimenting with multiple empty lots and using the map edit tool to change the lot boundaries, the ideal lot I found was lot 79, Crumplebottom Court. It’s not ideal but it does blend in with the other lots adjacent.

  1. Similar to the Mashuga lot moving processes, alt tab out of the game
  2. In the Userdata/houses directory, copy the House02 file and paste it to the desktop
  3. Rename the file from House 02 to House 79
  4. Paste it into the same Userdata/houses folder, overwrite if prompted
  5. Alt/Tab back into the game, switch between hood 2 and 1 to refresh the screen
  6. The lot should appear but looks a bit… iffy. This is because the lot is a lot larger than the lot it has replaced, fortunately we can do something to amend the lot data using the map_edit tool
  7. Enter lot 79
  8. Hold Ctrl Shift C, in the command box, enter “map_edit on”

This puts you into the map editor mode, were you can select the tiles we are able to edit, this also controls which roles appear on the hood screen. Thankfully this lot is quite large and has a lot of editable space.

The shaded/red square tells the game that the tile can be user edit, whilst the white parts tell the game this tile is off limits and cannot have objects placed on it. You will notice both sides of the lot are unshaded, along with the road at the front of the house, which should give you an idea how the map edit works.

For this lot, we want to section off the rear, so the map on the nhood screen wont bleed onto the road (technically the map is the wrong way round compared to the nhood screen, but this wont affect the game stability and is purely for cosmetic, you will however lose the ability to place objects in this area but since this is a huge map that should not be a huge issue, also the carpools will continue to function normally)

Once you are happy with the map, hold Ctrl Shift C and enter map_edit off to disable the map editor, and then save and exit back to the hood. You must save the game by using the save button (floppy disk icon) first, then press the neighbourhood icon, if you just press the neighbourhood icon you will lose all map editing changes, the game wont even ask if you wish to save. I think this occurs because no new items have been placed on the lot or no game time has elapsed, so the game thinks no changes have been made to to the lot, despite editing the map parameters.

Once you hare happy with the changes, we can go ahead with importing the Snooty Patooty family

Phase 3 – Importing the remaning Vacant lots

Migrating the remaining vacant lots from hood 2

The second hood contains 2 vacant lots which we can import into the first neighbourhood, however there are a few clashes that we nee to solve before we can migrate them to hood1

1 Sim LaneClashes with the downloaded Jones family
7 Sim LaneClashes with the Newbie Lot in Hood1

1 Sim Lane

Lot 65 seems to be a good fit

  • Alt tab out of the game
  • Goto Maxis/Userdata2/Houses
  • Copy House01 to the desktop and rename it to House65
  • Copy an paste House65 to the UserData/House directory, Overwrite if prompted
  • Enter the lot, once loaded enable the map edit tool (map_edit on)
  • for this lot I would unshaded the hilly areas at the back of the lot
  • Once everything is correct, turn off the map edit tool (Map_edit off)
map editing lot 1

Lot 7

We can move this lot onto lot 50 Ridge Road

  • Alt tab out of the game
  • Goto Maxis/Userdata2/Houses
  • Copy House07 to the desktop and rename it to House50
  • Copy and paste House50 to the UserData/House directory, Overwrite if prompted
  • Enter the lot, once loaded enable the map edit tool (map_edit on)
  • This lot you can unshaded the right side, near the patio next to the road.
  • Once everything is correct, turn off the map edit tool (Map_edit off) and then save.

The ‘Other’ Lot 2 – The Agent Household

There is another Maxis download known as the Agent house, however given the size of the house and lot, i’m not sure on the best way to integrate it into the hood. This lot also occupies lot 2 so it would conflict with the mansion from the original game and the Snooty Patooty household.

Lot 67 seems to be a good candidate but requires a lot of map editing.

There isn’t much room to cut away before you start selecting tiles that are already occupied. Still it’s not too visible from the hood screen, only the white tiles can be seen overlapping onto the road.

That’s it! i’m not sure if there were any additional lots or families released by EA/Maxis for the original game but we at least have a vacant lot on 51 Ridge Road for future use. Unfortunately with the original sims you are quite limited on how lots can be placed in a single hood, in addition to the quantity of lots. Looking at the game files it seems theirs an engine limit of 99 lots, with many being used for commercial lots. Strangely lots 11-20 are unused by the game, with the Downtown lots start from 21 -30. Maybe there’s a way be can unlock and access these lots and find a way to map them on the main neighbourhood screen so they’re accessible by the game.

Windows Longhorn (Milestone 7 – Build 7074)

It’s no secret that Microsoft’s Windows Vista went through a troubled development cycle. Much of the features introduced in Vista were a reaction to Mac OS X Panther and Tiger. This is similar to what Apple went through when it developed the Copland operating system where feature creep took priority over stability and many new features would be added but were then left unrefined as the development team continued to implement more features.

Build 7074 pictured here is considered to be one of the more stable build prior to the reset, yet suffers from occasional explorer memory leaks that can impact the overall performance.

The setup utility looks very different compared to the XP and final Vista interface.

All Done

Now for the ritual of installing the drivers. I did run into an issue with the virtual box drivers initially not installing, this was fixed by running the VM addons setup applications in compatibility mode for Windows XP.

After a quick reboot and we have full graphics acceleration. The first thing you will notice is the side bar to the right, which houses the gadgets, clock, quick launch and the tray icons. These were previously on the task bar itself, freeing it for the running applications.

The start menu meanwhile remains unchanged from Windows XP aside from a new colour scheme

Pressing Ctrl+Alt+Del yields a new Windows Security Prompt screen, from here Task Manager can be invoked.

One of the many glitches that can happen in thus build, a quick reboot fixes it.

Windows Explorer has undergone a significant face lift, building on the change introduced in Windows XP, more information is shown in relation to the drive status, earlier access to common document shortcuts. While the new appearance is a welcome change, the waste in screen real estate is not, especially the blue area near the top of the screen. Storage favourites lets you bookmark folders in Windows explorer, similar to how bookmarks function in a web browser.

The new games area

I wonder if there are any updates for this build?

One of the main attractions of Longhorn was a redefined search facility, however in this build it still functions the same as how the XP search facility operated. Indexed search would not appear until after the Longhorn reset. Also no search assistant :/

Two Properties? One is for the start menu older properties and the other for the task bar settings.

Longhorn comes with several visual styles, Slate (currently set) and Jade

Jade version of the Start menu

Outlook Express has had a redesign

A new feature added was the hardware and Devices sections that lists all devices installed in the system, a more graphical version of device manager.

System Properties

Internet Explorer in action, I’m surprised the Windows Update page still works, although this seems to be for the final Windows Vista version

You can change how the operating system delivers notifications, presumably form the tray icons

Installing The Sims…

Whilst it works OK most of the time, running it in windowed mode and panning the camera can yield some interesting graphics glitches, thankfully they go away when you release the right mouse button.

Nice feature, you can change the starup programs without having to use MSCONFIG

Not sure I like the file details being in an explorer window, certainly not an efficient use of space

Sample of a crashed program in Windows Longhorn

Sadly GTA3 refused to install on this build, despite using compatibility mode.

Not sure what fast items are, the replacement for quick launch?

Also the side bar can be resized,

Shutting down Longhorn

Overall this is considered to be the last stable built of Longhorn pre-reset, as the next few builds would become incredibility bug ridden. The sidebar is also an unusual concept that may be seen as a distraction. Thankfully it can be set to auto hide. However a common theme is that a lot of windows have a lot of vacant space (see the top blue area of My Computer) which take up a lot of screen estate, and the UI buttons (search) in explorer are also quite large with no option to resize them. This becomes an issue when running this build on systems with a low resolution display, since it is easy for the screen to become cluttered, especially since low end laptops, ultra mobile PC’s and netbooks started to become popular towards the end of the XP era.

I don’t remember seeing this on my digibox

So I stumbled on a document regarding Sky’s WapTV designs, which were supposed to be the next major milestone for interactive TV. Seems that at some point you would have been able to browse and manage your household and utility bills online via the services section of the digibox.

Sky Guide Services
I think we missed an EPG update :/

Meanwhile here is what the Services section looks like on an actual Digibox;

Sky guide service epg

My guess is the existing services menu options listed above would be nestled under the ‘SKY’ option. Maybe with a link to the Sky customer zone, which was an interactive service that allows customers to manage their Sky account, now known as ‘MySky’. Instead it was listed under the interactive section. Links to the ‘program My Remote’ and ‘PIN control reset’ would have also been useful here. Overall the services section was very underused on Sky digital. Interesting is that there is no other option for Broadband or Mobile (unless it was bundled under TELEPHONE)

That said can we all appreciate how good the EPG background looks? I don’t see why we couldn’t have had that background instead of the light blue from the later revisions of SkyGuide.

Also in-case anyone is interested in the document, I have attached it below.