Or an ethernet hub
Despite the Superhub’s remaining property of Virgin Media, when I asked about the return on the Superhub, they advised that the hub didn’t need to be sent back, most likely because they have moved into the Superhub4, and that the old hub can be disposed of.
This seems quite wasteful, since the hub works perfectly. I’m not a fan of disposing electronics needlessly if its in working order. Besides if you need an extra few ethernet ports, why not reuse the equipment you already have?
Starting from Scratch
Probably best to reset the hub back to its factory state. This can be done by holding the reset button down for 10-12 seconds, then waiting for the router to restart

Configuration
Enter 192.168.0.1 into the browser address bar to access the superhub configuration page, you will need to enter the settings password, which can be found on the underside of the superhub.
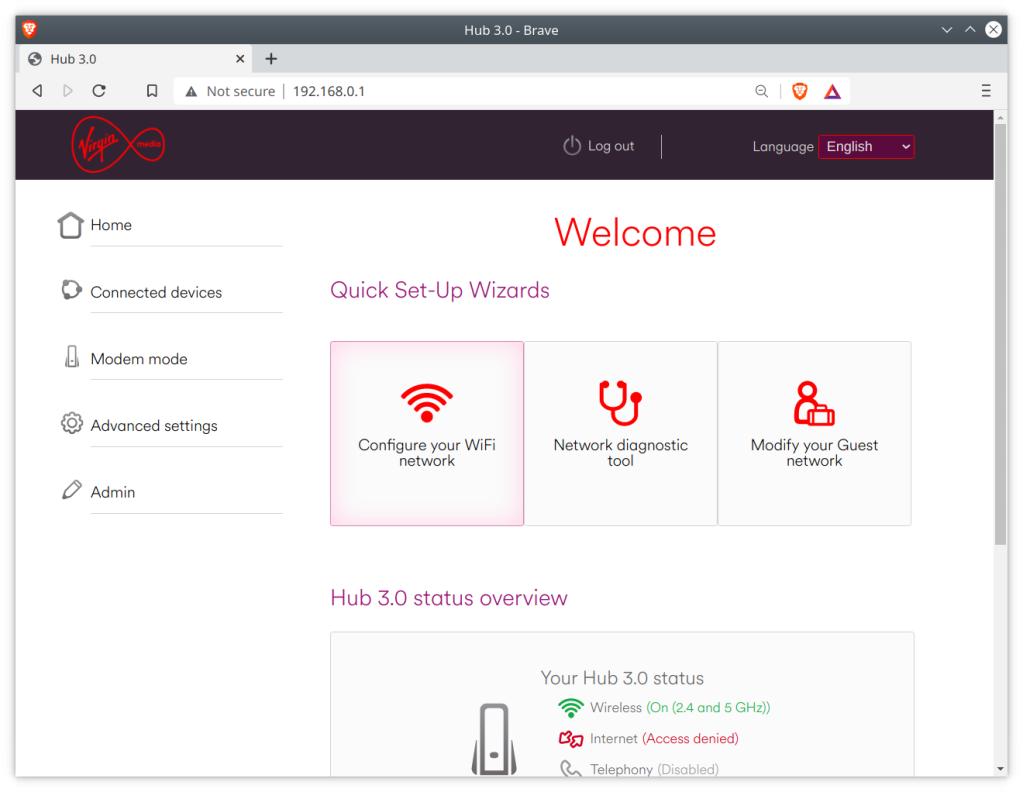
Before we make any major changes, we can configure the basic settings using the interface. Use this to change any settings relation to the Wifi configuration, as it will be harder to change later.

Disabling DHCP
Since you will be using the superhub on a network that already has a DHCP server, you will need to disable the DHCP on the superhub, since your main router will perform the DHCP duties.
What is DHCP? It is responsible for issuing and maintain the IP address on your network, which ties into NAT (Network address translation). You only need one on your network, having multiple DHCP servers is unnecessary unless you have an enterprise network. Also not to be confused with HDCP

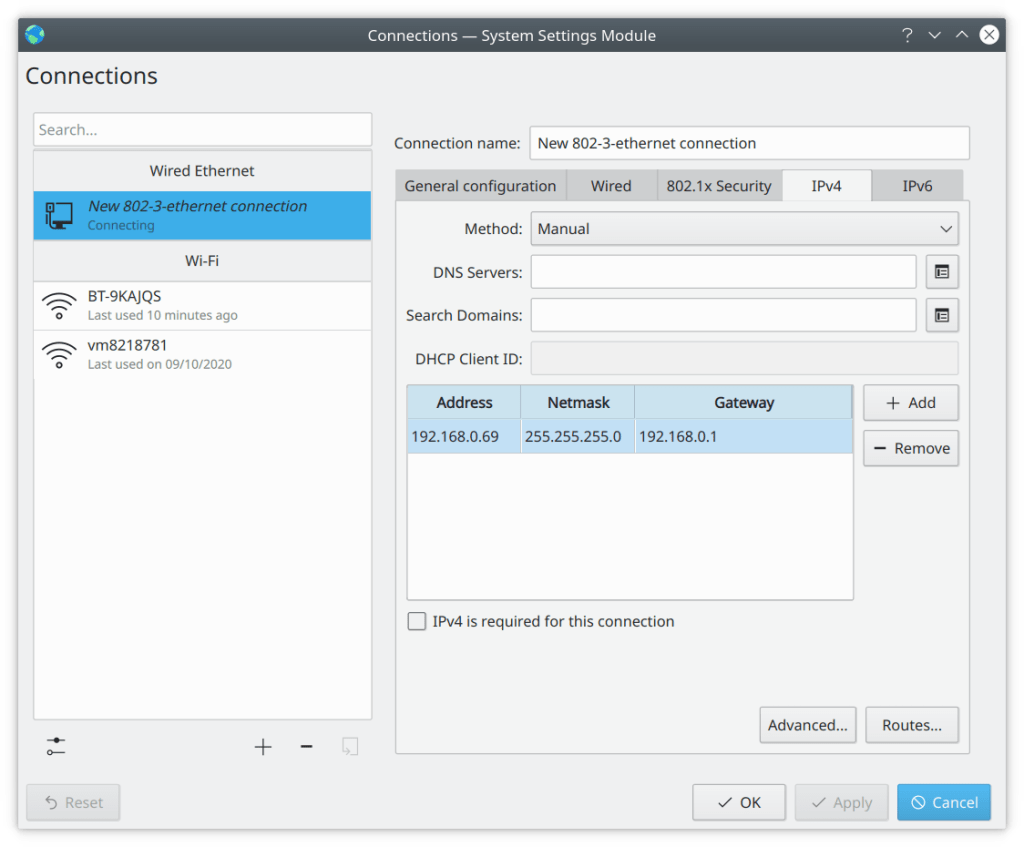
After this you will lose network connectivity with the router, this is because the super hub is no longer assigning IP address. To restore you will need to switch to a static IP temporarily whilst we configure the router. In Kubunu you can configure this in the connections panel in the system settings. For Windows there are various tutorials on how to configure a static IP.
Remember to use 192.168.0.1 for the default gateway, as for the client IP address, you can use 192.168.0.2, You might need to login to the router interface again.
Changing the gateway IP (optional)
You might not need to do this, depending on the IP configuration of your network. By default the super hub uses the address 192.168.0.1 as long as you don’t have any other devices using this address then you should be fine, but you should check first regardless.
Unfortunately with the superhub 3, if you change the default IP address to anything other than 192.168.0.1, the configuration page is no longer accessible. the router will still function as a switch or hub but you will no longer be able to edit any settings or access the configuration page. therefore before you do this, ensure the superhub is configured as you prefer as you will be unable to modify them later, unless you perform factory reset.
This also means that if you have two superhub 3’s, then you will need to do this on one of the superhubs to stop one from interfering with the others, since its a bad idea two have two devices using the same IP address, especially if one is a router/gateway.
Normally you cannot change this via the default interface. We can work around this by entering commands via the address bar as outlined below.
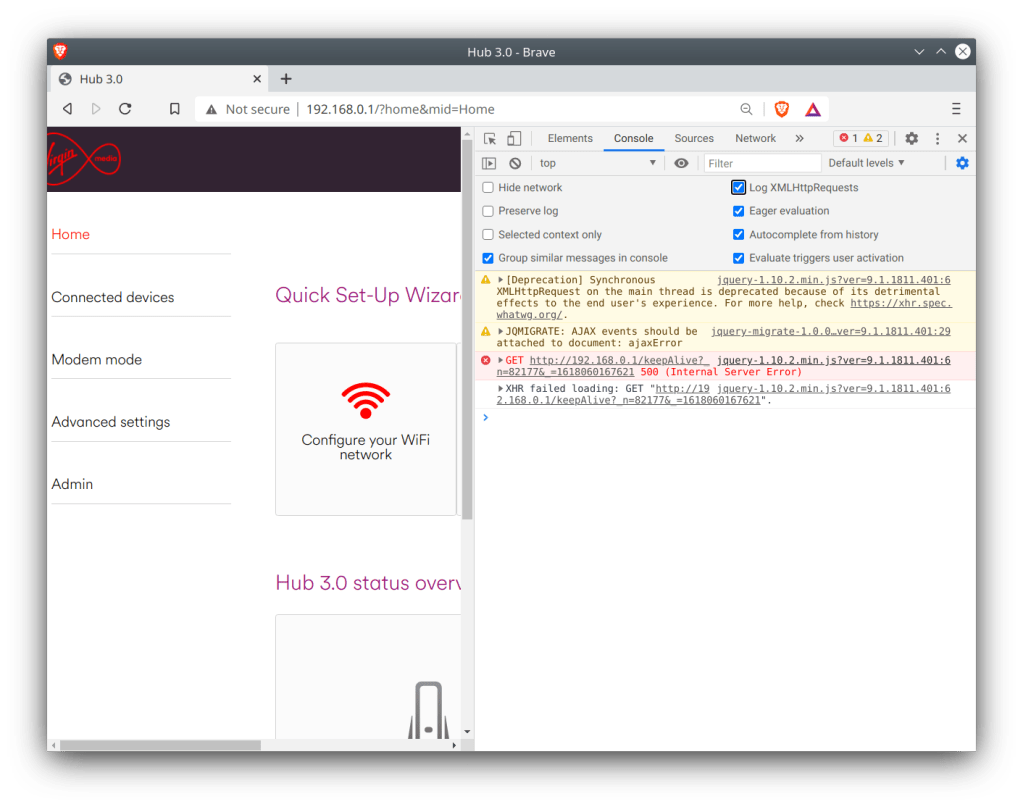
First, enable the developer window in your browser by pressing F12
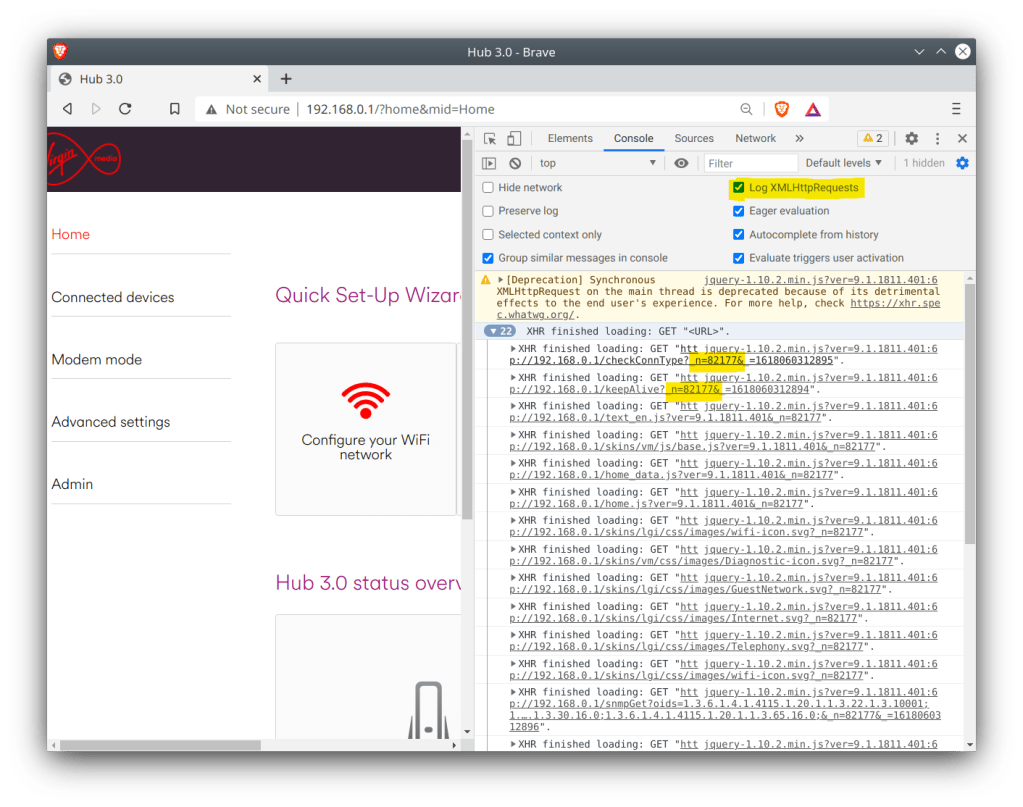
For Chrome based browsers, Click Console, then enable LogXWLHttpRequests
For Mozilla based browsers, this should be enabled by default
Refresh the router page and inspect the console log
We need to get the authenticator code. This is generated when you log into the router interface and can be found highlighted below, and will begin with n=, followed by a random string of numbers, in this case mine was 82177
To change the default gateway address to 192.168.1.1, use the address below and paste it into the browser, changing the n= value at the end to the one we noted down earlier
http://192.168.0.1/snmpSet?oid=1.3.6.1.4.1.4115.1.20.1.1.2.2.1.5.200=%24c0a80101;4;&_n=0Best Hex to IP Converter / Translator (codebeautify.org)
likewise if you wanted to change it to 192.168.0.2 instead
http://192.168.0.1/snmpSet?oid=1.3.6.1.4.1.4115.1.20.1.1.2.2.1.5.200=%24C0A80001;4;&_n=0To save and apply the settings, again amend the n= number
http://192.168.0.1/snmpSet?oid=1.3.6.1.4.1.4115.1.20.1.1.9.0=1;2;&_n=0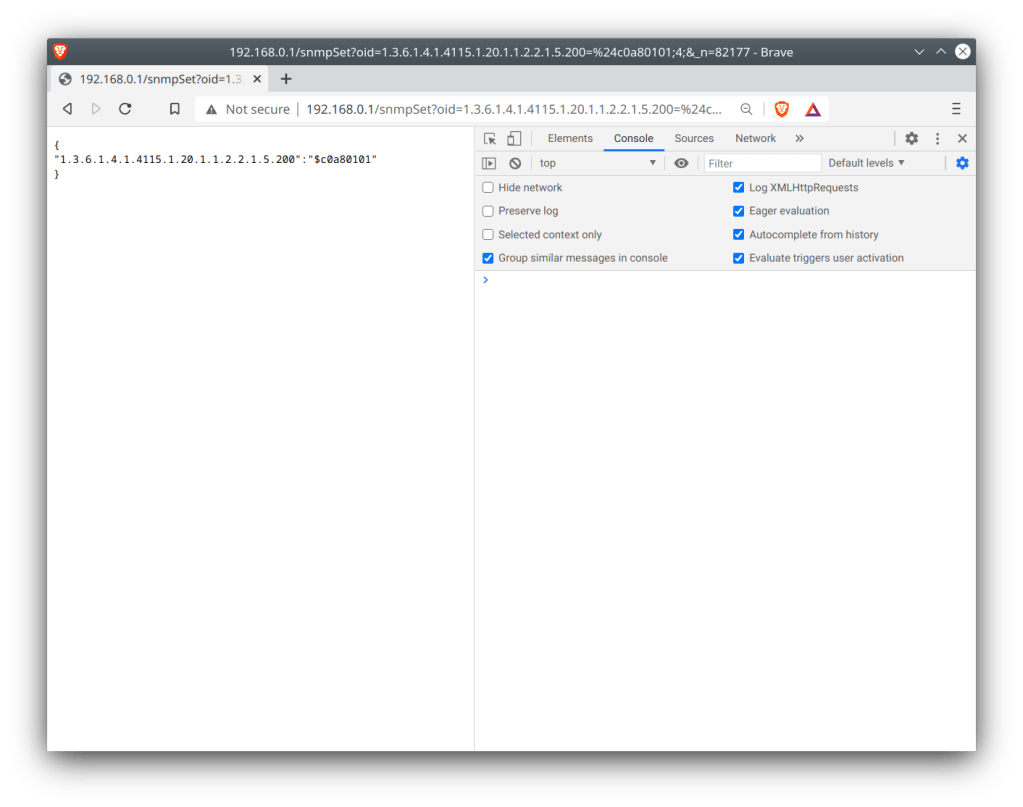
The Superhub should shortly reboot itself after. If not, check the commands have been issued correctly, especially the last one since that applies the settings.
Does it work well?
Almost, there are a few issues with the router being in this setup.
One of which is the constantly flashing green light at the front of the hub. This is due to the router attempting to find a DOCSIS signal, even though it is technically connected to the internet, the cable modem side of things is still trying to connect via its coax connection. There’s no option to disable this so I’d advise to just tape over the light, since its never going to find a DOCSSIS signal.
Firmware updates for the Superhub are delivered via the cable network only, and the Superhub has to be authorised at the headend in order to receive the update. This means you will be stuck with t he same software currently on the router. Whilst this isn’t a huge issue, since the Superhub firmware is relatively stable, with the main issue being on the cable side of things which we are no longer using.
Further Information
Re: Superhub 3 internal network address – Virgin Media Community
Original Process used to change the default gateway address on a superhub 3.

Thanks for the guide. Just got my new hub 4 and replaced the SH2 (used as wireless extender and switch) out in my room separate from the main house. Worked like a dream and I’m still able to get the admin interface on the new ip
LikeLiked by 1 person
mate, how did you actually connect two routers? is just put ethernet cable in any port of extension router, I’m confused about that.
LikeLike
Hi, thank you so much for this! I was faffing about for ages trying various ways of getting this to work, but this seems to have done the trick. Annoying that Virgin make it difficult to do this, but hey ho. Amazing stuff, really appreciate the help. Thank you again! 🙂
LikeLiked by 1 person
mate, how did you actually connect two routers?
LikeLike
how do i actually connect my old virginmedia router with my BT broadband, using ethernet cable? if so which port ?
LikeLike
How do i actually connect my old Virgin media router with my new BT broadband, using Ethernet cable? if so which port should I connect it into?
LikeLike
Any ethernet port should work fine on both routers, as long as DHCP is disabled on the Virgin one.
LikeLike
I can’t get this to work. Is this still current.
LikeLike
Thank you so much. I thought for half a day I had made the fatal mistake of fixing something that wasn’t broken. I didn’t know that the superhub 3 did not allow the ip address to be changed like in the superhub 2 settings. The only explanation of a fix is this post. Apart from me being dumb the directions are brilliant and most important it works. Yes the green light flashes. But compared to re pairing countless sonoffs and other automation devices the light is a very small price to pay.
Thanks for sharing your knowledge. I had my doubts but what a nice surprise when everything connected and back online.
No black spots in house. Excellent speed and range. 5g all over house offering full 100mbs download speed.
Anyone doubting this fix. It does 100% work. It’s the only option as far as I can see with out buying more hardware.
I made mistake if changing to manual dchp on laptop instead of on the network adapter. Perhaps that could be clearer in explanation but its more likely that its my lack of knowledge that caused me to make the error.
Really happy. Thanks again
LikeLike
After following the guide it does work as a WiFi extender but I’ve ran into a problem on the fire TV it keeps doing the connection diagnostic every few minutes making the fire TV unusable.
LikeLike
This great and the clearest explanation i’ve found. thanks 🙂
Can any tell me, for the second hub can you plug a computer in via ethernet as well as use the wifi? ?
Or is it only extending for wifi use?
LikeLike
The other Ethernet ports will work fine. With one port being connected to the main router, you can connect upto three other ethernet devices.
LikeLike
I have an existing Hub 3 so when i try to log on 192.168.0.1 its try to log onto my existing hub
LikeLike
Thanks for this blog
I’ve managed to connect the Hub3 up to my main router via ethernet.
Any idea why the surf to my main router is about 350mbs but the speed with connected to the Hub3 is only about 35mbs?
LikeLike
Thanks for simple easy to follow instructions which worked for me. I was just sent an upgrade router/modem from VM to replace a hub4, I did not want to throw out the hub4 so followed above and now using it as a switch, perfect! Thanks so much for advice, regards Jon.
LikeLike
Hi there, how does 1 router talk to the other? Do i have to hardwire them?
LikeLike
Unfortunately this doesn’t work for me. I have Hub 3.0 firmware 9.1.2208.100
Could you please confirm, if you know, that works with this version?
Thanks
LikeLike
My use-case is trying to make my Hub operate as an Ethernet bridge:
Broadband[BTHub5]VirginSuperHub2====ComputerWithoutWifi
Where represents a wifi connection and ==== represents an ethernet connection. This is a bit different to what most people are trying to do:
BroadbandRouter====VirginSuperHub2WifiDevices
I’m able to do this with a Raspberry PI 3+, is it possible with a Virgin SuperHub?
I was intrigued as to how you found out the CGI commands for changing snmp:
http://192.168.0.1/snmpSet?oid=1.3.6.1.4.1.4115.1.20.1.1.2.2.1.5.200=%24C0A80001;4;&_n=0
The possible solutions I’m considering are:
1. SuperHub takes its own connection from Wifi instead of the broadband.
2. Hack the SuperHub’s OS to achieve what the Raspberry PI does.
-cheers from Julz
LikeLike
How annoying, when I posted it, it deleted the bit that indicates Wifi:
My use-case is trying to make my Hub operate as an Ethernet bridge:
Broadband[BTHub5].:))) ….. (((:.VirginSuperHub2====ComputerWithoutWifi
Where .:))) ….. (((:. represents a wifi connection and ==== represents an ethernet connection. This is a bit different to what most people are trying to do:
BroadbandRouter====VirginSuperHub2.:))) ….. (((:.WifiDevices
Etc, the rest is the same as the previous comment.
LikeLike
Hmmm maybe thay have changed the firmware on the Hub 3 as I am unable to find the authentication number using the method above…. any ideas as to how to change the ip address for the router ? Thanks!
LikeLike
can this be done with the hub 5
LikeLike
Pingback: Reusing a Virgin Media Superhub 3 as a Wifi Extender | Drew1440: Blog | Minhbach's Weblog
First do a hard reset on the box (pin in the tiny pinhole and then turn it on and after about 10 secs take out the pin)
FInd out what the IP of your router is and write it down.
Write down your current wifi password and the name of the wifi network (if not the same as what was given on your new router)
Next
I just turned off the wifi on my new internet router (which also broadcasts the main wifi signal). Then I connected via ethernet my Hub 3 to my computer and logged in via 192.168.0.1 and used the password listed on the box (not the wifi password). The light on the hub tends to glow steady green before you can get into the login page for the old hub
Once logged in, disable DHCP, set a fixed IP (use a similar one to the IP no you wrote down – choose something alot higher in case you have other computers or other items that use the internet – tv/ev charger/game box/alarm etc etc)
Change the name of the routers wifi name and password to the exact same as your new router as if they were identical.
I altered the Wifi settings to be a limited frequency (802.11n or 802.11ac) but bear in mind ACs shorter wifi reach especially in 5ghz mode.
Look for a repeater mode in the admin page to turn on. Forcing a firmware update tends to work easier if you are still with Virgin and probably impossible if you have moved internet provider
Now turn off the old hub, turn back on your wifi on the new router and reconnect as normal.
Now the hub should work as a wifi range extender. If not then you will need to run a cable from the new router to where you want the old hub to overcome poor wifi signal. This is a pain in the … so look for a repeater mode in the admin page. If you are still with virgin they may help out to force a firmware update. Tell them the internet is patchy and wondered if they can see if the latest firmware is on it, if not then they can force an update. Again no hope of this if you have left virgin.
LikeLike
Great instructions.
I currently have stable broadband on a static up using a Three data SIM on a Huawei router which is so much better than VM.
My Canon network printer only works when cable connected to my Hub5 which is at other and of house to my Three router & I access by connecting to my old VM network SSID. After I disable DCHP on the Hub5 is there any way I can keep my printer connected to the HUB5 with its own up so I can print from any other device on the Three network?
LikeLike